
Assuming you’ve read and followed part 1, now on part 2 we’ll get our SSH keys created, and the gitlab-runner registered with gitlab as a “runner” so we can create our pipeline.
Configuring the SSH Keys for Gitlab-Runner
To make the local gitlab-runner on your machine have the correct keys, you need to generate them as that user. Here’s some useful links to assist you.
- https://docs.gitlab.com/ee/ci/ssh_keys/
- https://docs.gitlab.com/ee/user/ssh.html#generate-an-ssh-key-pair
A key thing to remember is that your keys must not have a passphrase set when created, otherwise it will prompt, but you’ll not be able to see it and your pipeline won’t run!
Now in my particular example i’m going to be running the pipeline tasks under “root”, however the documentation https://docs.gitlab.com/ee/ci/ssh_keys/ shows you how to do this under the “gitlab-runner” user instead and also how to create key in more detail.
But as mentioned in our case we need to run under the “root” user, so we’ll generate a SSH keypair within “root”, so when gitlab-runner executes our pipeline and its tasks it can 1. trigger a pull of the most recent configuration from our project repository but 2. have the correct permissions to be able to execute command to say restart services like Apache2.
sudo -s
(now root)
ssh-keygen -t rsa -b 2048You should place the key in the default location ~.ssh/id_rsa and ~.ssh/id_rsa.pub. You can use other locations, the links above will help you with how to do that, but using different paths is beyond the scope of this document.
Now we need to add the keys into gitlab, to do this firstly log on to gitlab. Click on your icon (profile) and then click, “Preferences”.
Now click “SSH Keys”.
Copy and paste the contents of the ~.ssh/id_rsa.pub file into the “key” box, and give the key a title. You can leave the expiration date as the default for now, which is 1 year.
NOTE! Ensure you are pasting in the Public SSH key, not the private one. The private one is to be kept….private!
Once the key has been imported, let’s test you can SSH to gitlab from your machine without needing the key, you can do this with:
ssh -T git@gitlab.com
ssh -Tvvv git@gitlab.com
Assuming all is well you’ll get a “Welcome to Gitlab!” and your username message.
Setup Git and Push the Initial Configuration
Now we are ready to push our Apache configuration into our gitlab repository. So:
sudo -s
(now root)
Run these commands to ensure the git configuration specifies the correct user:
git config --global user.name "Your Name"
git config --global user.email "thingy@doberry.com"
In our case the directory is owned by root, so we need to perform these steps as root to ensure the git configuration can be created correctly. So let’s setup git and create our initial commit.
cd /etc/apache2
sudo git init --initial-branch=main
sudo git remote add origin git@gitlab.com:tristan.self/apache2.git
sudo git add .
sudo git commit -m "Initial commit"
sudo git push --set-upstream origin main
Now refresh the gitlab repo, you should now see all the files have been uploaded.
Recap Where we Are
Okay, so now let’s recap where we are, we have:
- Created the git repository (project).
- Installed the gitlab-runner on our target host.
- Set the gitlab-runner to run as a service.
- Registered the gitlab-runner with our project (repository) as a runner that the CI/CD pipeline can use.
- We’ve then configured the “root” user with an SSH key, and provided that public key to gitlab as a trusted key, which means we can pull and push files into the project repository.
Okay, so what’s next. Well we now have the Apache2 configuration in the repository, but we’ll not want any of this to be manual, what we want is that we can clone this repository to our normal workstation (i.e. not this server), make a change to the Apache2 configuration, commit it, then merge it and for the pipeline to start and trigger the gitlab-runner to automatically pull down the latest version of the configuration and apply it.
So, let’s do that now.
Configuring the Pipeline Files
So currently we have no CI/CD pipeline configuration for that we need to add a .gitlab-ci.yml file into our repository, this file determines the pipeline configuration, and although this is a simple example the pipeline can be very complex with a number of stages, inputs, outputs etc.
For this inital setup its recommended to be performing the creation of the next two files directly in the Apache2 configuration directory /etc/apache2, so you can just push it up when we’re all done (and trigger the pipeline to start for the first time).
Create the following file .gitlab-ci.yml at the root of the repository (project) with the following contents:
stages:
 - verify
 - deploy

verify-apache2-config:
  stage: verify
  image: ubuntu/apache2
  script:
    - echo "Checking config"
    - apachectl configtest

update-apache2-config:
  stage: deploy
  script:
    - ./deploy.sh
Let’s just explore what this file does. It defines the pipeline, so our pipeline has two stages: “verify” and “deploy”, then within each stage we have the steps that are going to be taken.
In the “verify” stage it uses a Docker image to verify that the configuration is syntactically correct, if this stage was to fail (a typo in the configuration file for example), then the pipeline will stop and it won’t apply duff configuration to your server.
Assuming all is well then the pipeline moves to the “deploy” stage, this quite simply tells the gitlab-runner to trigger the deploy.sh BASH script file, which you now need to create in the root of the repository with the following contents:
#!/bin/bash
set -e

# another quick syntax check, in situ rather than in separate CI runner
# 'set -e' will catch errors, no need to explicitly check

echo "Configuration Updated!"

user="root"
git_home=/etc/apache2

echo "Updating master repository..."
sudo -u $user /usr/bin/git --git-dir=${git_home}/.git fetch
sudo -u $user /usr/bin/git --git-dir=${git_home}/.git --work-tree=${git_home} pull origin main

echo "Reload Apache2 Configuration"
sudo systemctl reload apache2
You also need to make this file executable with:
chmod +x deploy.shOkay create, so now we have the CI/CD configuration set within
Let’s commit and push this configuration to repository, which will then trigger the first run of our pipeline!
Commit, Push and Run!
For these steps, we’ll first commit and push our CI/CD pipeline files, then swap to look at gitlab to monitor what happens.
sudo -s
(now root)

cd /etc/apache2
sudo git add .gitlab-vi.yml
sudo git add deploy.sh
sudo git commit -m "Added CI-CD files"
sudo git push origin main
You’ll now see the little blue clock symbol, this shows that CI/CD has found a pipeline and has started to run it. Click on the clock symbol and we’ll inspect what is going on….

So the new files have been commited, you may want to make some random (benign) change to a configuration file, but otherwise you should now see the two stages either running or have run (depending on how quickly it scheduled and ran them).
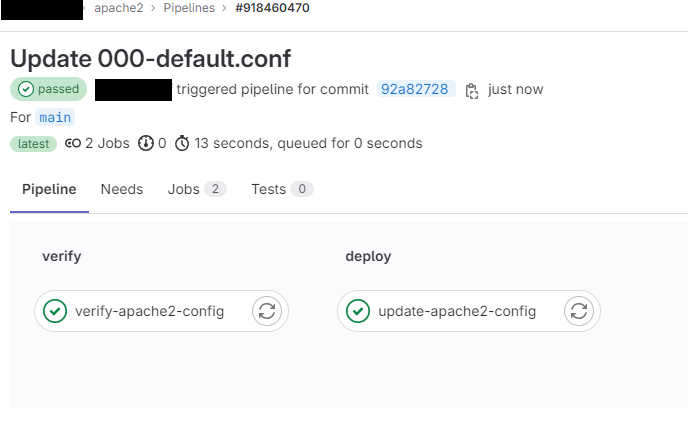
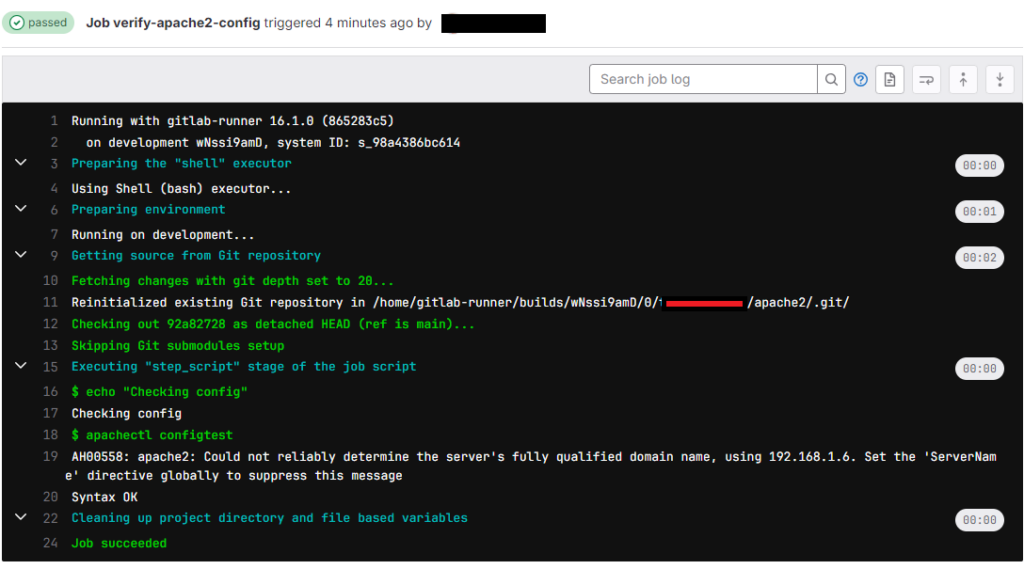
All appears to be fine, so let’s click on the “verify” stage. As you can see all fine, no errors in the configuration.
So if we then click on the next stage (i.e. the “deploy” stage) we can then see:
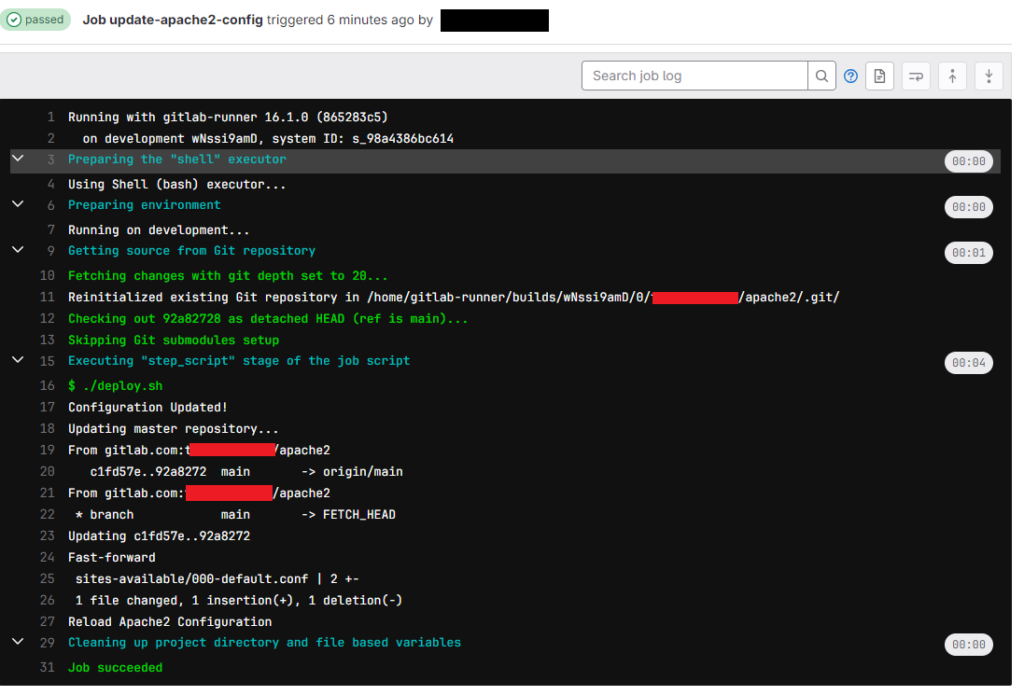
And again all is good, we can see the deploy.sh has been run, it has pulled down the latest copy of the repository files from gitlab and then successfully reloaded the Apache2 configuration.
A Bit of Troubleshooting
I had a few issues with permissions, the first time I ran the pipeline I got the following error. Stack overflow appeared to help here: https://stackoverflow.com/questions/64329037/gitlab-shell-script-permission-denied
$ ./deploy.sh
bash: line 127: ./deploy.sh: Permission denied
To fix you can do this:
sudo git update-index --chmod=+x deploy.sh

sudo git commit -m "fix"

sudo git push origin main
The CI/CD will then re-run and you should be good!
Conclusion
And that is it. We have our test web server host setup with a git repository held locally and a CI/CD pipeline which can trigger tasks to take place on the host via the gitlab-runner.
If you want to check what is going on you can tail the syslog to watch the gitlab-runner do its thing, this can be seen with:
tail -f /var/log/syslogAdditional Random Information
sudo chmod g+w -R .git
1 thought on “Using Gitlab CI/CD to Manage Configuration (e.g. Apache2) – Part 2”