
Building upon the example Simple Terraform Docker Example (Ubuntu Linux), we’ll store our Terraform State in AWS S3 Bucket, rather than just locally on the machine running Docker. Yes, I know its not a very useful example, but it simply illustrates the mechanism and how it can be used for more useful and complex deployments.
Storing Terraform State in AWS S3 Bucket
Storing the Terraform State in an AWS S3 Bucket instead of locally within a directory is pretty straight forward. Follow the steps below to create the required bucket, this assumes you already have access to AWS in a suitable form.
Create AWS S3 Bucket
1. Create a directory on your developer machine for your Terraform infrastructure to go into, e.g. state-s3-example.
2. Create a main.tf file with an example infrastructure, you can use Simple Terraform Docker Example (Ubuntu Linux) as an example if you wish.
3. Create an AWS S3 bucket in your chosen region, give it a suitable name, for this example we’ll use: my-terraform-state1
4. Ensure you Enable Versioning on the bucket.
Login to AWS Account from CLI and Configure AWS S3 Provider and Terraform Backend
Login to your S3 account where the bucket has been placed at the CLI, so your CLI session is able to access AWS.
Ensure you have specified your AWS_PROFILE with the current profile you’re wanting to login with:
export AWS_PROFILE=<profile name>Add into your Terraform providers configuration (or configuration file), the following, obviously adjust as per your needs. You can see the new section for “Backend” which specifies where the state should be stored which is added to the “terraform” directive.
terraform {

...

  backend "s3" {
    bucket                  = "my-terraform-state1"
    key                     = "state-s3-example"
    region                  = "eu-west-2"
  }

...

}
Then also add an additional provider for AWS which will specify that you’ll need the AWS provider which will then be downloaded by Terraform when the environment is initalised.
...

provider "aws" {
  region                  = "eu-west-2"
}

...
Deploy Terraform Infrastructure and Check State
Now you’re all set, so now, initialise your Terraform environment with:
terraform initThen apply the infrastructure with:
terraform applyYou’ll see it create the Docker containers, while doing this the associated Terraform State file(s) will be written to the AWS S3 Bucket. Assuming you’re using the Simple Terraform Docker Example (Ubuntu Linux) example given above, you’ll see that within the S3 bucket there is now a state file created.
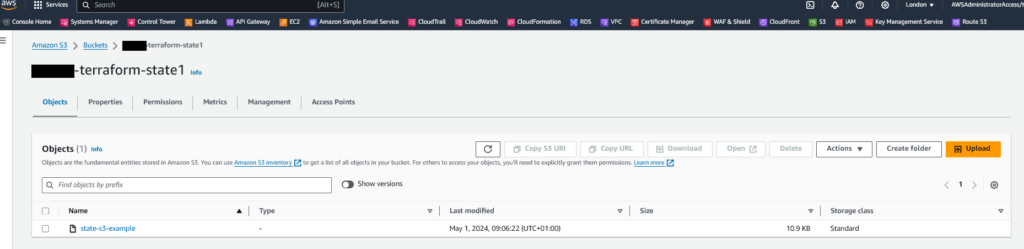
Click the “Show Versions” button, so you can see versions of the state file/object. If you’ve not run terraform apply multiple times, you may only see the single original version.
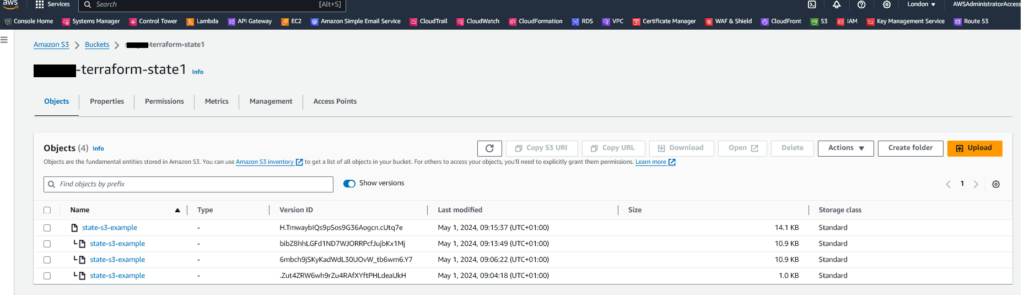
Let’s see the that versioning works, so assuming you are using the Simple Terraform Docker Example (Ubuntu Linux) example, copy and paste the directives for a container and make it unique.
Then, re-apply the configuration with the following to deploy the newly created container.
terraform applyNow observe refresh the S3 page and you should see there are multiple versions of the Terraform State shown. For example:
If you wanted to see the contents of the Terraform state file in human readable format in the CLI you can run the following:
terraform showGranting User Access to Terraform State in S3 Bucket
Obviously having the state stored in S3 is helpful, but you need it to be accessible to multiple persons, by default an S3 Bucket has Read/Write access granted to the Bucket owner, depending on your configuration, this may require a S3 Bucket Policy to be added, if required you can use an example such as the below to provider access to the S3 bucket.
{
    "Version": "2012-10-17",
    "Statement": [
        {
            "Sid": "TerraformS3Access",
            "Effect": "Allow",
            "Principal": {
                "AWS": [
                    "arn:aws:iam::111122223333:bill",
                    "arn:aws:iam::444455556666:bob"
                ]
            },
            "Action": [
                "s3:*",
                "s3-object-lambda:*"
            ],
            "Resource": "arn:aws:s3:::my-terraform-state1"
        }
    ]
}
Using AWS DynamoDB for Terraform State Locking
The first question is “why?”, what is the reason for having state locking of your Terraform State for your infrastructure. Well, if its just you managing the infrastructure, then its just you so there is no need, but in the real world, you’ll have two or more persons (and automated processes) who/that will need to update the Terraform State, when this is the case you need some form of state locking to avoid bad things happening.
Terraform state locking is a mechanism that prevents concurrent access to the same Terraform state file from multiple users or automation processes. In other words, it ensures that only one user or process can make changes to the state at a given time. This is crucial because Terraform state contains information about the infrastructure’s current state and what changes are planned. The benefits (citation) are as follows:
- Data Integrity: State locking prevents data corruption and ensures that only one user or process can modify the state at a time. This guarantees data integrity and consistency.
- Concurrency Control: It allows multiple team members to work on the same project simultaneously without the risk of conflicting changes.
- Error Reduction: State locking minimizes the chances of encountering errors resulting from concurrent updates to the state file.
- State Recovery: In the event of an unexpected failure, a locked state can be recovered to a consistent and known state.
A single DynamoDB table can be used to lock multiple remote state files (as a single Terraform infrastructure may have many state files), and you’ll likely have many different projects each with their own Terraform configuration files, Terraform State and therefore Terraform State locking information.
Create AWS DynamoDB Table
1. Go to AWS DynamoDB.
2. Create a table called: terraform-state-lock-dynamo.
3. Create a Partition Key within this table called: LockID, as a String.
4. The Default Settings may be used.
5. Click “Create Table”.
![]() To make things easy, ensure your DynamoDB is created in the same Region as your S3 bucket.
To make things easy, ensure your DynamoDB is created in the same Region as your S3 bucket.
Add State Locking Configuration to Terraform Configuration File(s)
Edit the relevant Terraform configuration file to add the “dynamodb_table” line as shown in the configuration below, you need to input the table name you created a moment ago.
terraform {

...

  backend "s3" {
    bucket                  = "my-terraform-state1"
    dynamodb_table          = "terraform-state-lock-dynamo"
    key                     = "state-s3-example"
    region                  = "eu-west-2"
    shared_credentials_file = "~/.aws/config"
  }

...

}
Save the configuration file.
Deploy Terraform Infrastructure and Check State and State Locking
We’re now ready to start using the Terraform State Locking via the DynamoDB table. Because the Terraform “backend” directive has been changed, you’ll need to re-initialise your Terraform environment.
terraform initIf you’ve already been managing the state without locking, you’ll get an error and options for what to do, typically you’ll want to “migrate-state” by running:
terraform init -migrate-stateOnce re-initialised, we’re ready to apply our Terraform infrastructure configuration, so we can run:
terraform applyOnce applied if you use the “Explore Items” feature of DynamoDB and examine the database you’ll see something like the following:
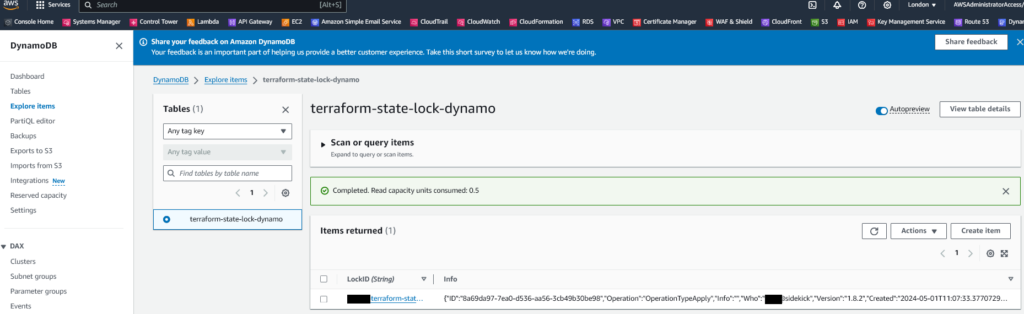
As you can see the Terraform State now has locked entry added. You’ll also notice there is a Terraform State MD5 digest added too.
Verifying the State
As mentioned you’ll see an MD5 has of Terraform State. Even when the Terraform State Lock has gone, this will persist, it gives you the MD5 hash of the most recent Terraform State file to be applied.
To verify, using AWS S3 download the most recent Terraform State file to your machine, then run it through your favourite MD5Sum tool to check the contents, as we can see in the below the two digests match!

Where is the Terraform State Lock item within the DynamoDB Gone?
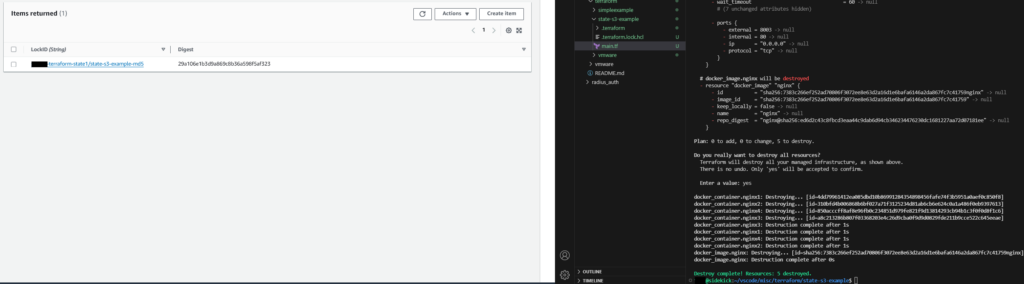
The Terraform State Lock Item within the DynamoDB is only a short lived thing. It only exists for the time that an ongoing operation is underway against the infrastructure, i.e. against the Terraform State file(s) from a person running a Terraform action (e.g. apply or destroy) or from an automated process, essentially if a second user or process was to turn up at this point and attempt to make another change to the infrastructure (i.e. against the Terraform State file(s)) it would be rejected, and therefore consistency is maintained! ![]()
While the operation is underway, you can see the Terraform State Lock Item in the DynamoDB is there.
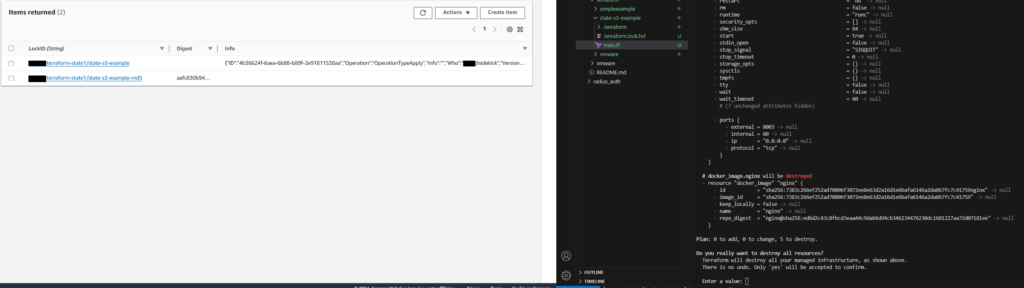
Now the operation has completed, the Terraform State Lock Item in the DynamoDB has gone.
At this stage, all you are left with is the MD5 hash which should be the MD5 hash of the most up to date Terraform State file.
Breaking the Lock
If something goes wrong you could be left in the position whereby the LockID is stuck in there. Before the operation it (i.e. the person or process) that is executing the change must be able to successfully acquire the lock from the DynamoDB database, if a Terraform State Lock Item is already present, then it must wait, if however something bad happened and the State Lock is now stuck, you’ll need to deal with it.

Perhaps if an end user was performing an operation and they lost connectivity to the infrastructure (and Terraform State, DynamoDB), if this is the case then there needs to be some remedial action taken.
Danger, Will Robinson!
You can force through the lock with the terraform force-unlock command, see force-unlock, this is not recommended unless you are 100% sure you know what bad thing happened and nothing is still actively changing the infrastructure.
1 thought on “Storing Terraform State on AWS S3 Bucket (including AWS DynamoDB for State Locking)”