We’ve reviewed many of the key parts of BGP and the way it works, what we haven’t gone into much detail on is security of BGP. BGP as a protocol was developed in a much more trusting era, but over time additional layers of security have been added to BGP and it’s implementations on many manufacturers routers. We’ll explore some of these aspects on what the potential threats are and then what you can do to protect your network, whilst ensuring that you are a good neighbour to other organisation’s Autonomous Systems (and networks); due to the scale of this topic it won’t be an exhaustive exploration, but will provide the key aspects of what you’d need to do.
Topology
We’re not making any changes as such to the topology, but we will be adding the odd extra network interface or loopback interface so we can attempt to simulate some attacks. Most of our focus will be implementing some additional security controls, so our current network topology looks like this.

Threats
There are a number of threats to security, not just those that are malicious, there are those that are accidental that are often equally damaging and often more frequent. Note this is not an exhaustive list of threats, but certainly some common ones, with some example mechanisms that we’ll explore with some example configurations.
The UK’s NCSC provides some good best practice guidance within their document: Responsible Use of the Border Gateway Protocol (BGP) for ISP Internetworking.
Why does BGP Need Protection?
BGP runs over TCP Port 179 and has no built-in encryption, it just assumes the BGP Neighbours peers are trusted and accepts whatever routes a peer advertises (unless filtered), which means that an attacker (or a misconfiguration) can inject bogus routes, hijack prefixes (for steering traffic in incorrect directions), leak full routing tables which can overload routers, tear down sessions and cause outages and/or incorrect routing of traffic for Denial of Service (DOS) or traffic capture purposes.
The main threat categories are:
- Session Attacks – Attacks such as resetting the TCP connections, spoofing a session (making a router think it’s talking to something it trusts when it is not), resource exhaustion (causing outages).
- Route Injection/Hijacking – Advertising prefixes you don’t own to steer traffic incorrectly to your network (for capture) or to perform Denial of Service attacks, manipulation of routing tables.
- Route Leaks – Similar to the above, but probably most common, where routes are leaked to where they should not go. Such as advertising the full Internet route table, leaking internal routes to external networks.
All of which can degrade the Confidentiality, Integrity and Availability of networks and the valuable networks that flow over them.
Spoofed Session Resets or Unauthorised Session Establishment
So in these threat scenarios, an attack would forge a TCP packet for a BGP session, or they might have taken control of the router, either way your router receives a crafted packet (of sorts) which has the reset flag set, and your router removes the BGP session immediately, the routes advertised are withdrawn. Once this happens routes are propagated and traffic is re-routed (or not if this is a single link – which is in some cases it may be). You could end up with denial of service, or session flapping.
Unauthorised session establishment is where an attack attempts to make your router peer with an illegitimate peer; it may be by injecting a neighbour request to create a peer, once this is done they may attempt to pollute the routing table with illegitimate routes, which black hole traffic or stop traffic going to the intended destination (for possible intercept).
In either case, normal traffic routing is disrupted, network availability is put at risk or worse interrupted and data can be captured and/or manipulated.
These risks of these can be resolved a few methods, but the most common is the use of TCP MD5 Authentication to authenticate a session, with the assumption being that if an attacker does not know the shared secret, they can’t spoof a session with your BGP Router. Additional methods like TTL Security (General TTL Security Mechanism GTSM) can be used, or adding ACLs to restrict the peer IP address to only the expected IP of the peer.
Route Injection/Hijacking
These forms of threat are types of attack that can be deliberate or accidental (misconfiguration), either way they impact the availability of the network and the flow of traffic across the network. These types of attack involve injecting routes into a network to achieve some outcome (of the attacker). For example advertising in a network prefix to deliberately black hole traffic (so it goes nowhere), or send traffic via an unexpected path so it can be captured; furthermore it can be used to not just disrupt one network, but other networks (and the wider Internet) by potentially leveraging other misconfigurations that leave networks exposed to injections or unexpected changes.
There are a number of different protections that can be added for these types of attack, all of which circle around applying forms of filtering (or policy) to restrict routes accepted (or sent) and look for specific characteristics to validate the route being advertised is what it is supposed to be and coming from where it is expected to be coming from.
Off-path Spoofing Attacks
Similar to the first type of attack explained above, but a bit different. Its called “off-path” because the attacker is not actually in the traffic path, and cannot see traffic, but they may still be able to disrupt traffic. They’ll perform things like spoofing a reset of the session, attempting to inject in a new session from their own router, once they have done this, (and without suitable controls applied to filter on your router), they can inject routes that will disrupt traffic in your network.
Ways to mitigate this threat are things such as applying BGP TTL Security (General TTL Security Mechanism GTSM) where if your router is directly peering with another router, you add filters to expect BGP TCP packets with a TTL 255, i.e. they have been through no intermediate “hops” thus avoiding an attacker somewhere else on the network or Internet from injecting a session request because they can’t manipulate the TTL to keep at it 255 as it passes through multiple routers (assuming of course they have not comprised these).
Unfortunately, I could not find how this could be done in Extreme Networks XOS, so for these purposes of this document, this will remain theoretical.
Spoofed Session Resets or Unauthorised Session Establishment – Authentication of BGP Neighbour Peering to Avoid Spoofing Attacks
A commonly deployed mechanism is BGP Neighbour peer authentication. It’s as simple as that, you use a shared secret between your router and a neighbouring AS’s router when forming the BGP neighbour relationship. It can be used on iBGP or eBGP, but typically you’d want to use it when creating a BGP neighbour relationship to another AS where you’re not in control of the hardware (or configuration) at the other end.
Essentially when the BGP neighbour peer session is brought up, a shared secret in the form of an MD5 has is exchanged. If the hash value is what is expected (by the other end) the neighbour relationship is made. If it is not, then the session is not established. This mechanism is a simple way to prevent spoofed session resets, perhaps there has been a security incident at the remote end which you have no visibility of, an attacker would not be able to bring in another session without you knowing.
Configuration
Configuration is pretty straightforward you can use a shared secret (or an MD5 Hash of a shared secret), in our example we’ll use the following:
- Plain Text: secretpassword
We’ll then use it on the BGP Neighbour peer between Router K and Router L, let’s say that because Router L is a eBGP peering, and it’s not that well trusted.
Router K
We just specify the password on the BGP Neighbour configuration as follows. You’ll need to disable the BGP Neighbour peer before you add this configuration, then re-enable it afterwards.
configure bgp 192.168.100.66 password secretpasswordRouter L
We just specify the password on the BGP Neighbour configuration as follows. You’ll need to disable the BGP Neighbour peer before you add this configuration, then re-enable it afterwards.
configure bgp 192.168.100.65 password secretpasswordVerify
The BGP Neighbour peer has come up fine, so it appears the authentication is working.

But, let’s try to break it instead. Let’s say we change password on Router L that is used on it’s BGP Neighbour peer with Router K. Remember we need to disable, then re-enable after making the change.
configure bgp neighbor 192.168.100.65 password secretsecretNow we’ve done this, we can see that the BGP Neighbour never makes it beyond CONNECT state, so the BGP Neighbour peer is never successfully made.

Before we continue let’s correct the password to what it should be, and ensure the BGP Neighbour peer between Router K and Router L is working before we continue.
Route Injection/Hijacking – Securing Route Exchange
We’ll explore a few methods of securing your network (and routers) from these types of threat, as there a few, we’ll explore in each turn.
Filter Routes with Policy (Inbound and Outbound)
Something we’ve covered earlier, and that is to create a route policy for routes coming into your router (from other routers) and for routes being sent from your router (to other routers). Applying incoming and outgoing filters ensures you are 1. protecting your network, but also 2. being a good neighbour and protecting others. If all system administrators of all AS put in place filter policies to only accept or transmit what they are expecting, then the risk of nefarious or accidental actions causing issues is much reduced.
As a specific example (and this is covered more later on in the article), let’s ensure we are only sending the route prefix for 10.4.0.0/16, i.e. the two 10.4.0.0/24 and 10.4.1.0/24 networks from AS Red on Router K to Router L in AS Purple, we don’t want any other routes to be advertised out to Router L, because we don’t have any agreement for AS Purple to use AS Red as a transit network to get to AS Blue, AS Green etc. By limiting the traffic in this way we protect our network from nefarious or accidental damage.
Router K
Add the following policy onto Router K, create with: vi RK-RL-Out.pol
entry allow_transmit {
if match any {
        nlri 10.4.0.0/24 ;
		nlri 10.4.1.0/24 ;
	}
then {
        permit ;
	}
}
Then apply it with:
configure bgp neighbor 192.168.100.66 route-policy out RK-RL-OutVerify
Now when we check the BGP Route Table on Router L, we can see that we only now have routers for 10.4.0.0/24 and 10.4.1.0/24 which is what we want.

We would also want to control the routes we are accepting from Router L (AS Purple), but this is covered later on in this article.
Maximum Prefix Limits
The Maximum Prefix Limits puts in place a limit to the number of Prefixes (Routes/Networks) that can be learnt from a BGP Neighbour or any BGP Neighbour (depending on your configuration); once a limit is exceeded you can shut down the BGP session and/or warn and log, thus protecting your network.
Ok, so why would this be useful? Well, it’s down to trust a BGP neighbour, or not, depending.
Let’s use an example, if a BGP Neighbour you are peered with suddenly does something like the following: leaks the full Internet route table, accidentally redistributes IGP, has a bug or routing issue, then without any kind of Maximum Prefix limits, your router would just happily accept all these routes causing your network to meltdown, and if you too haven’t applied policies to your upstream links (or those at the other end of those upstreams haven’t done the same), then you could find that you loose all your uplinks too, because they will consider Your Network as the problem!
Within a Maximum Prefix limit in place this effects of this particular example are very different. All that happens is that if the BGP Neighbour leaks the full Internet route table, and you were only expecting say 2 prefixes from them, then your router will automatically either shut down the BGP Neighbour session or warn (and log) depending on your configuration. Normally this would be configured to shut down the BGP Neighbour session thus protecting your network, disaster averted; sure you’ll potentially lose connectivity to your neighbour’s network, but your network will be protected.
Exactly what you should set these values too would vary depending on your particular circumstances and network, but typically you’d want to balance a configuration that offers you protection while not shutting down a neighbour if they were to just add a new network prefix one day.
A key thing to also remember is this is purely based on the count of routes (prefixes) received not the actual content of them!
Configuration
So in our scenario we are again going to consider that AS Purple Router L as an untrusted AS. We’ll want to ensure that we don’t accept any more than 2 routes from them, if we do, we want to shut down the BGP Neighbour peering because something is clearly going wrong!
Adjust Policy
We’re going to adjust the policy to permit all routes within the supernet 10.5.0.0/16 from Router L (AS Purple), so within the “allow_expected” directive we adjust this from specifying just one network prefix to specifying the whole prefix.
RK-RL-In.pol
entry deny_bogons {
  if match any {
    nlri 100.64.0.0/10;
    nlri 127.0.0.0/8;
    nlri 169.254.0.0/16;
    nlri 198.18.0.0/15;
    nlri 198.51.100.0/24;
    nlri 203.0.113.0/24;
    nlri 224.0.0.0/4;
    nlri 240.0.0.0/4;
  } then {
    deny;
  }
}

entry allow_expected {
if match any {
        nlri 10.5.0.0/16 ;
}
then {
        permit ;
}
}
You may need to run a: refresh policy RK-RL-In to ensure the policy change is applied.
Router K
Add the maximum prefix configuration to the BGP Neighbour from Router K to Router L, meaning if we get more than 3 routes sent from Router L we’ll teardown the BGP Neighbour peering. There are additional options that can be added, but in this case we are looking for something simple, if it detects more than 3, it just tears down the BGP Neighbour peer session, and it stays down until a System Administrator takes some action.
configure bgp neighbor 192.168.100.66 maximum-prefix 3 teardownRouter L
Create two new networks on Router L to pretend to be some new networks which have been added unexpectedly to see what happens to our BGP Neighbour configuration.
create vlan "RouterL-LAN3" tag 1021
configure vlan "RouterL-LAN3" ipaddress 10.5.2.1/24
enable ipforwarding "RouterL-LAN3"
enable loopback-mode vlan "RouterL-LAN3"

create vlan "RouterL-LAN4" tag 1022
configure vlan "RouterL-LAN4" ipaddress 10.5.3.1/24
enable ipforwarding "RouterL-LAN4"
enable loopback-mode vlan "RouterL-LAN4"

configure bgp add network 10.5.2.0/24
configure bgp add network 10.5.3.0/24
Verification
So now that’s applied, let’s have a look at what happened. We first check the router log, and we can immediately see the below showing that the BGP Neighbour 192.168.100.66 (Router L) has sent more than the expected number of route prefixes.

If we now check the BGP Neighbour status, we can indeed see it has torn down the session as we wanted it to.

If we then run the following command, and look at the status of the neighbour with:
show bgp neighbor 192.168.100.66We get the following output:

Notice the bottom, its now saying is in IDLE or CONNECT state, and the LastError is because of “Cease – Peer Max Prefixes Exceeded” which is what we wanted, Router L sent more than the maximum allowed routes and so Router K dropped this BGP peer.
So our policy applied ensures that the routes are only within the expected network prefix range(s), i.e. 10.5.0.0/16 in this case, but the maximum prefixes rule ensures that the connection is dropped if more than the expected are received.
We’ll now remove this maximum prefix configuration from Router K with, then issue a disable and enable to get it back to working state again:
configure bgp neighbor 192.168.100.66 maximum-prefix 0
disable bgp neighbour 192.168.100.66
enable bgp neighbour 192.168.100.66
So we are then ready for further exploration of other security features.
AS_PATH Filtering
AS_PATH filtering is exactly what it says, and goes a bit further than just accepting the route or not accepting the route (prefix) which you have with a policy. It builds upon this by layering on additional validation of the route and which AS it has flowed through to reach your router (and/or your AS).
Its worth referring to the diagram above when you read the following section so you can visualise the AS_Paths and which AS the route would have passed through on its way to the one you investigating.
Putting in more detailed terms, you can use AS_PATH Filtering to ensure you are:
- Accepting routes (prefixes) from a directly connected Autonomous System (AS), e.g. AS Red (65004) would only accept a route from AS Purple if it had only one AS listed in the AS_PATH, i.e. 64005.
- Accepting only routes prefixes from directly connected Autonomous Systems AND one Autonomous System behind the first one, e.g. Router D in AS Green (65002) would only accept a route (prefix) for 10.5.0.0/24 from AS Red (65004) IF its AS_PATH contained only 65004 and 65005 in that order.
- Deny specific transit autonomous systems, e.g. if AS_PATH contains say a known bad AS or AS which are using non-public AS on the public Internet, these would likely be bogus, and even if the route (prefix) is one that is allowed, where the router is learning it from is not.
- And other scenarios.
Example AS_PATH Filtering with Router D
Using Router D (within AS Green), we’ll apply a filter (policy) on the routes it is learning from Router F, specifically for the untrusted AS Purple (65005).
We’re going to do two demonstrations, the first will demonstrate how we can apply AS_PATH filtering, and the second will demonstrate how a change to the expected AS_PATH for certain prefixes (routes) means the routes will then be discarded.
Because we are concerned that AS Purple (65005) will cause us issues, we’ll ensure two things:
- Ensure that 10.4.0.0/24 and 10.4.1.0/24 are only accepted if each of their AS_PATH is “65004”.
- Ensure that 10.5.0.0/24 and 10.5.1.0/24 are only accepted if each of their AS_PATH is “65004 65005”.
But we’ll then also ensure that:
- These four subnets 10.4.0.0/24, 10.4.1.0/24, 10.5.0.0/24 and 10.5.1.0/24 are the only ones that are accepted by Router D from Router F, all other routes received will be discarded.
Then to demonstrate and in lieu of changing the topology, we’ll change expected AS_PATH in the filter policy for the routes coming from AS 65005 (Purple) to pretend something has changed and that we want these to be discarded.
Review Current Situation
So currently we can see we have loads of routes being received from Router K by Router D, but as mentioned above, we want to restrict this somewhat.

Demonstration 1 – Apply AS_PATH Filtering Router D Configuration – Only Accept Routes with Desired AS_PATH
We first add the policy file with: vi RD-RK-In.pol.
And add the contents as below to ensure that:
- Ensure that 10.4.0.0/24 and 10.4.1.0/24 are only accepted if each of their AS_PATH is “65004”.
- Ensure that 10.5.0.0/24 and 10.5.1.0/24 are only accepted if each of their AS_PATH is “65004 65005”.
- These four subnets 10.4.0.0/24, 10.4.1.0/24, 10.5.0.0/24 and 10.5.1.0/24 are the only ones that are accepted by Router D from Router F, all other routes received will be discarded.
We’ll then apply this to the BGP Neighbour with: configure bgp neighbor 192.168.100.46 route-policy in RD-RK-In
entry allow_expected1 {
if match all {
	    nlri 10.4.0.0/24 ;
		as-path 65004 ;
	}
then {
        permit ;
	}
}

entry allow_expected2 {
if match all {
	    nlri 10.4.1.0/24 ;
		as-path 65004 ;
	}
then {
        permit ;
	}
}

entry allow_expected3 {
if match all {
	    nlri 10.5.0.0/24 ;
	    as-path "^65004 65005$" ;
	}
then {
        permit ;
	}
}

entry allow_expected4 {
if match all {
	    nlri 10.5.1.0/24 ;
	    as-path "^65004 65005$" ;
	}
then {
        permit ;
	}
}
Once applied, show let’s see what the received routes are:
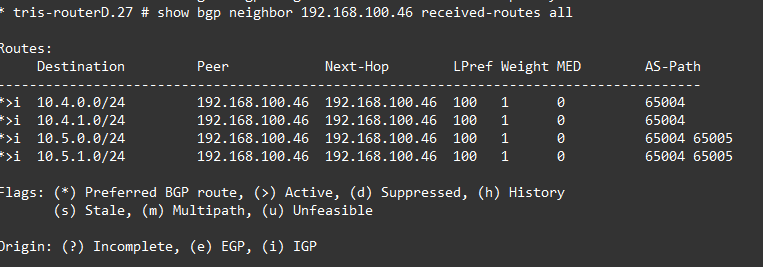
And yes that’s what we want, we are only getting those four routes being advertised, and only accepted if their AS_PATH matches the expected value(s).
Demonstration 2 – Apply AS_PATH Filtering Router D Configuration – Only Accept Routes with Desired AS_PATH
Now we have proven the policy is working for the normal, let’s pretend that we were expecting the 10.5.0.0/24 and 10.5.1.0/24 prefixes (routes) to have the AS_PATH value of “65004 65005 65006” instead, meaning that currently the received value is “65004 65005”, i.e. not what we’re expecting. So essentially we’re saying that we normally would expect these networks to have an AS_PATH value of “65004 65005 65006” but now its only “65004 65005”, which means someone unexpected is going on is the untrusted AS Purple (65005) and we want to discard the routes.
We update the policy file: edit policy RD-RK-In.pol and update it as follows, notice the changes to the AS_PATH lines of the allow_expected3 and allow_expected4 directives.
entry allow_expected1 {
if match all {
	    nlri 10.4.0.0/24 ;
		as-path 65004 ;
	}
then {
        permit ;
	}
}

entry allow_expected2 {
if match all {
	    nlri 10.4.1.0/24 ;
		as-path 65004 ;
	}
then {
        permit ;
	}
}

entry allow_expected3 {
if match all {
	    nlri 10.5.0.0/24 ;
	    as-path "^65004 65005 65006$" ;
	}
then {
        permit ;
	}
}

entry allow_expected4 {
if match all {
	    nlri 10.5.1.0/24 ;
	    as-path "^65004 65005 65006$" ;
	}
then {
        permit ;
	}
}
Once applied, let’s check the status of the received routes, and we can see they are indeed being discarded, because their AS_PATH does not match what we were expecting.

A deep dive into the syntax for the AS_PATH filtering options can be found in this Extreme Networks article: https://documentation.extremenetworks.com/exos_32.7.1/GUID-4986968C-FF7B-4627-BC63-4AE4B6108B80.shtml (Autonomous System Expressions)
BOGON Filtering
What is a BOGON? Sounds strange, put simply, it is a bogus IP space, which is an illegitimate IP address that fall into ranges not officially assigned by an Internet registration institute, such as the Internet Assigned Numbers Authority (IANA). A “bogon space” are ranges of IP addresses that should not been advertised on the public Internet (e.g. RFC1918) although they may be found on internal company networks. Perhaps a range of IP addresses from the global IP pool has not been assigned to any entities yet, therefore it should be used or seen on the public Internet, if they are, this is a BOGON.
Simply put we’re talking about a BGP filter typically to mitigate this threat. We can find lists of BOGONs and configurations from groups such as: Team Cymru https://www.team-cymru.com/bogon-reference-bgp. To mitigate, we filter the acceptance of these routes, if we receive one, we drop it, we must not accept it, because it is not expected to be used on the public Internet, therefore accepting such a route (freely) is a risk!
Important Note: Its worth noting that in our examples we are actually using the RFC1918 addresses as if they were global routeable IP addresses, so essentially we’re using BOGON routes, we’ll show an example that works around this limitation, but in production you would want to include network prefixes like 10.0.0.0/8, 172.16.0.0/12 and 192.168.0.0/16.
Configuration
We’ll work on an example where Router K which has a BGP Neighbour peering to the untrusted Router L will have a filter applied on incoming/inbound routes, we’ll ensure we specifically drop these BOGON routes, but accept other routers, although best practice would dictate, that rather than accepting any route, we restrict this to just the network prefixes, we expect to be sent to us from this AS (or Router), Router L in this case.
Router K
We’ll create a new inbound filter policy for what routes we are going to accept, as per the lab using RFC1918, we can’t just blanket drop these routes, like you would in a real deployment instead, we’ll just pick a few ranges from the BOGON ranges which we’ll use to demonstrate the principal, additionally we will also be explicitly allowing the expected route from the untrustworthy Router L (AS Purple) of 10.5.0.0/24.
We first add the policy file with: vi RK-RL-In.pol
entry deny_bogons {
  if match any {
    nlri 100.64.0.0/10;
    nlri 127.0.0.0/8;
    nlri 169.254.0.0/16;
    nlri 198.18.0.0/15;
    nlri 198.51.100.0/24;
    nlri 203.0.113.0/24;
    nlri 224.0.0.0/4;
    nlri 240.0.0.0/4;
  } then {
    deny;
  }
}

entry allow_expected {
if match any {
        nlri 10.5.0.0/24 ;
	}
then {
        permit ;
	}
}
A real production example would be something like:
entry deny_bogons {
  if match any {
    nlri 10.0.0.0/8;
    nlri 100.64.0.0/10;
    nlri 127.0.0.0/8;
    nlri 169.254.0.0/16;
    nlri 172.16.0.0/12;
    nlri 192.0.2.0/24;
    nlri 192.168.0.0/16;
    nlri 198.18.0.0/15;
    nlri 198.51.100.0/24;
    nlri 203.0.113.0/24;
    nlri 224.0.0.0/4;
    nlri 240.0.0.0/4;
  } then {
    deny;
  }
}

entry allow_expected {
if match any {
        nlri 10.5.0.0/24 ;
	}
then {
        permit ;
	}
}
Then apply it to the BGP Neighbour configuration with:
configure bgp neighbor 192.168.100.66 route-policy in RK-RL-InAnd refresh with:
policy refresh RK-RL-InAll being well, nothing should have changed, we’re not injecting any BOGON routes, and the expected 10.5.0.0/24 is still being received and accepted.


Attack and Verify
So lets as an attacker who has compromised AS Purple and got control of Router L attempt to cause some havoc by injecting some unexpected routes into the network, i.e. some BOGON routes. We’ll attempt to inject in two routes one for 0.0.0.0/0 i.e. a default route (which in certain situations can cause havoc) and the other is another subnet within the 10.5.0.0/16 supernet, so let’s go with 10.5.1.0/24.
Router L
We’ll create LAN interface to pretend to be the RouterL-LAN2 network (10.5.1.0/24) that we want to advertise.
create vlan "RouterL-LAN2" tag 1020
configure vlan "RouterL-LAN2" ipaddress 10.5.1.1/24
enable ipforwarding "RouterL-LAN2"
enable loopback-mode vlan "RouterL-LAN2"

configure bgp add network 10.5.1.0/24
We’ll also create a default route origination on the BGP Neighbour peer to Router K, so it injects the default IPv4 route 0.0.0.0/0 into the network.
enable bgp 192.168.100.65 address-family ipv4-unicast originate-defaultWhat is “route origination”? BGP route origination in is the process of introducing (local) network prefixes into BGP, marking them as self-originated rather than learned from peers. So in this case, we’ve not learnt the default static route from anywhere, we’ve just originated it from this router and sent it onto Router K on that BGP Neighbour peering as part of the attack.
Note however that “route origination” is not a nefarious command, its completely normal to use this command to ensure that a default static route is being advertised into your network where you want it to appear, even when you do have it being learned (and passed on by a neighbour) or imported from another protocol, e.g. static or OSPF.
https://documentation.extremenetworks.com/exos_32.4/GUID-42DE5346-5F90-4F49-AFD7-314FD34175A2.shtml
Verify Protection
Now we have our inbound filter policy in place on Router K and the nefarious routes being advertised from Router L, let’s see what routes that Router K has accepted and which it has rejected.
As we can see the route 10.5.0.0/24 which is known to be good is accepted.

The route 10.5.1.0/24 which our policy does not specify has been rejected, again good that’s what we wanted.
What is also worth noting is that the “rejected routes” says 2. That is because it is also rejecting the 0.0.0.0/0 default route we are also originating from Router L, but that is not showing up in this output for some reason.
If you can’t see the “rejected routes” in your output, even when you know there are some, see the section entitled “Not Seeing Rejected Routes from Neighbour” below.

Verify Without Protection
We’ll now remove the protection, i.e. remove the policy from Router K and see what happens.
Router K
configure bgp neighbor 192.168.100.66 route-policy in noneWe now have no filtering (policy) on this BGP neighbour, so all routes that Router L is sending to it are being accepted.


What’s more is you can see how such problems can propagate throughout the network, if not properly controlled. If we now examine the BGP routes on Router E which is off in another AS entirely, because we don’t have any filtering or policies in-between we see that the routes that a nefarious actor have inserted in Router L have made there way throughout the whole network. The default static route would be potentially directing traffic to nowhere, or somewhere we don’t want it to go!

Not Seeing Rejected Routes from Neighbour
An issue identified during writing this article was that the rejected routes were not being shown. This was due to the way XOS works, unless “soft-reset-in” is enabled on a BGP Neighbour configuration, the counter that is used to show these rejected routes is not used; hence the values appear blank. The Extreme Networks KB article explains more: https://extreme-networks.my.site.com/ExtrArticleDetail?an=000095632, it’s possible that similar behaviour exists in other manufacturer hardware.
To ensure that the router shows the rejected routes, we enable the following on the BGP Neighbour configuration as follows:
Router K
disable bgp neighbor 192.168.100.66
enable bgp neighbor 192.168.100.66 address-family ipv4-unicast soft-in-reset
enable bgp neighbor 192.168.100.66
Verify it has taken as expected with:
show configuration bgp detail | include softConclusion
In this article we have explored some of the security threats to BGP and examined how these threats might be reduced or removed through applying defensive configurations. Like with any cybersecurity threats, it’s all about understanding the threats, then your vulnerability to the threats and applying the proportionate (or required) controls to mitigate the risk in full or in part.
There’s plenty more to discuss on this topic, but this hopefully provides a good grounding of where to start with it.