The time of on-premise Microsoft Exchange servers is beginning to draw to a close, although the Microsoft Exchange Server SE will continue, its feature complete essentially as of Exchange Server 2019, although there may be the odd minor changes here and there.
Based on that replacing the certificate is a common task, the following instructions give you some guidance on how to do this, although specific to Exchange, it may be helpful for other certificate replacement tasks on Microsoft Windows.
I’m are assuming that you already have the replacement certificate (Private and Public Key) within a compatible PFX file. See https://geekmungus.co.uk/?p=4743 if you need to convert it!
Microsoft Exchange Server – Import Certificate and Determine Thumbprint
We first need to import the new certificate onto all of the on-premise Microsoft Exchange Servers so it can be used with various Exchange services. The certificate is to be installed into the Personal Certificates Store for the Computer Account of each of the Microsoft Exchange Servers. It is recommended to set a nice Friendly Name for the certificate so you can easily identify it in future, if you do not perform this at import time you can retrospectively change the name later.
Import Certificate
Next we need to import the certificate into each of the Microsoft Exchange Servers, so this import step will need to be repeated on each and every Exchange Server which needs to utilise the certificate for securing communications. From an Administrator PowerShell session on the server run:
Import-PfxCertificate -FilePath "c:\users\user\desktop\legacy-email.p12" -CertStoreLocation Cert:\LocalMachine\My -Password (Read-Host "Enter password" -AsSecureString) -ExportableYou’ll be prompted for the password (if there is one set), then all being well you should see an output like:

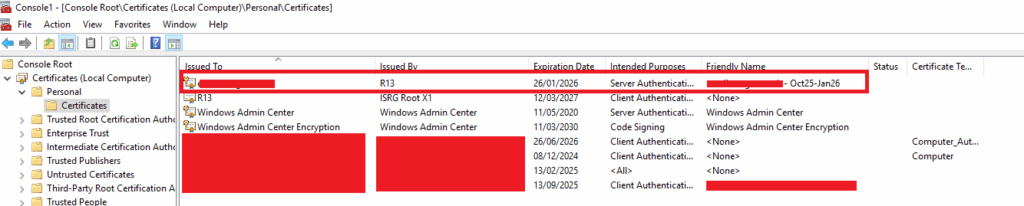
Additionally, if you love the GUI, you’ll see it within the “Local Computer” Personal Certificate store within MMC (with the Certificates snap-in):
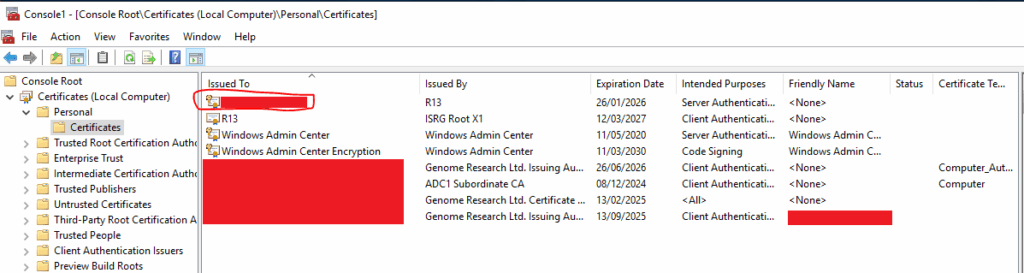
These show that it has been imported successfully.
If you see an error such as this upon import, then this means that the certificate which by default is created with AES256-SHA256 encryption is not supported on your version of Microsoft Windows, meaning you’ll need to convert it to something supported, see the section above entitled: “Convert the Certificate for Microsoft Windows Server 2016” for how to do this.

Determine Thumbprint of Imported Certificate
Now the certificate has been imported into the Personal (Computer) certificate store on each of the Microsoft Exchange Servers we can now obtain the thumbprint, which will be needed later on, the Thumbprint will be the same on each of the Microsoft Exchange Servers because the certificate is the same!
Run the following command:
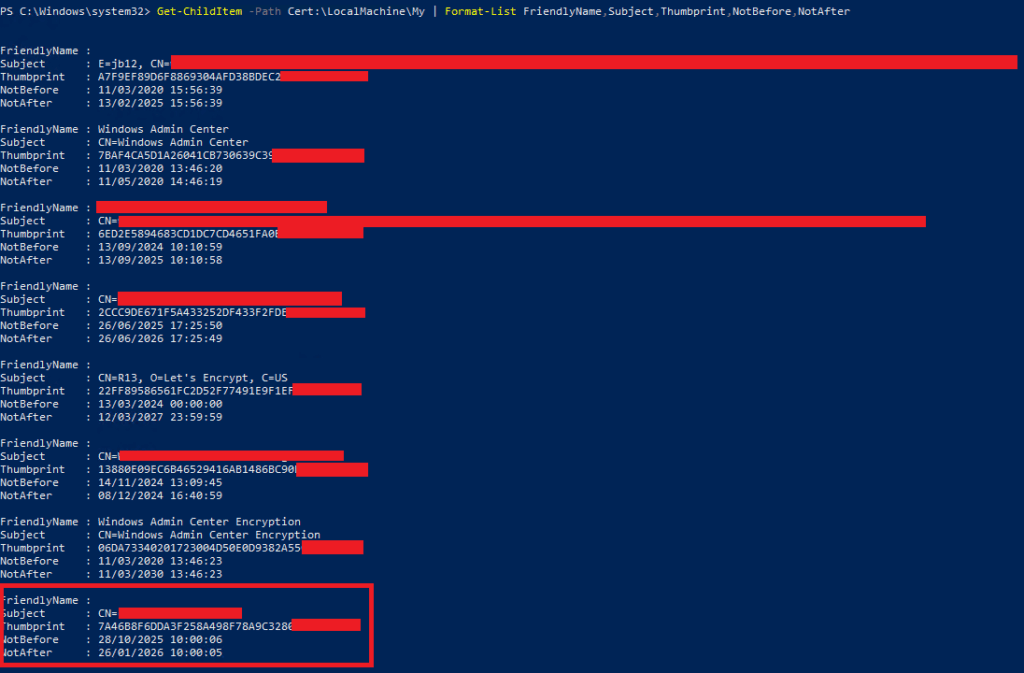
Get-ChildItem -Path Cert:\LocalMachine\My | Format-List FriendlyName,Subject,CertificateDomains,Thumbprint,NotBefore,NotAfterYou’ll get an output such as the following, as you can then see the newly imported certificate listed, and its Thumbprint, take a copy of the Thumbprint we’ll need this in a moment.
Or, you can run the following command:
Get-ExchangeCertificate | where {$_.Status -eq "Valid"} | Format-List FriendlyName,Subject,CertificateDomains,Thumbprint,NotBefore,NotAfterThe thumbprint is shown in the attribute called “Thumbprint”, you’ll need to find the specific one you are interested in. Which in our case is the one we have just imported.
Rename Imported Certificate (Optional but Recommended)
As an optional, but strongly recommended task, you should update the Friendly Name of the imported certificate to ensure its got a name that makes sense to you, for example if its a certificate for September 2025 to January 2026, then you could name it: “Q425-Q126 – www.mydomain.com” for example. As an example, we can see the friendly name is not set, let’s fix that.
Show Current Friendly Name
To show the current friendly name with the following command, substituting in the thumbprint you obtained in the previous step.
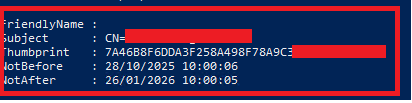
(Get-ChildItem -Path Cert:\LocalMachine\My\7A46B8F6DDA3F258A498F78A9C3280ECE2E9D847).FriendlyNameUnsurprisingly we’ll get nothing output!

Rename Friendly Name
Let’s add a suitable Friendly Name, something like “www.mydomain.com – Oct25-Jan26” would seem sensible in this case.
(Get-ChildItem -Path Cert:\LocalMachine\My\7A46B8F6DDA3F258A498F78A9C3281234232).FriendlyName = 'www.mydomain.com - Oct25-Jan26'You won’t get any output indicating its worked.
Verify Friendly Name Changed
To check if its worked, we just repeat the earlier command:
(Get-ChildItem -Path Cert:\LocalMachine\My\7A46B8F6DDA3F258A498F78A9C3281234232).FriendlyNameAnd we now see:

Microsoft Exchange Server – IIS Services (HTTP/HTTPS, IMAP, POP and SMTP)
We now need to assign the certificate to Exchange, the command needs to be run on each Exchange server individually to assign the new certificate and replace the old one for the specific services, POP, IMAP, IIS (HTTP/HTTPS) and SMTP.
Enable-ExchangeCertificate -Thumbprint "7A46B8F6DDA3F258A498F78A9C3281234232" -Services POP,IMAP,IIS,SMTP -Server SERVER1
Enable-ExchangeCertificate -Thumbprint "7A46B8F6DDA3F258A498F78A9C3281234232" -Services POP,IMAP,IIS,SMTP -Server SERVER2
Enable-ExchangeCertificate -Thumbprint "7A46B8F6DDA3F258A498F78A9C3281234232" -Services POP,IMAP,IIS,SMTP -Server SERVER3
Enable-ExchangeCertificate -Thumbprint "7A46B8F6DDA3F258A498F78A9C3281234232" -Services POP,IMAP,IIS,SMTP -Server SERVER4
You may then need to perform an IISRESET, by running “IISRESET”, however, this may not be required. Verify by checking if the new certificate is being presented.
Microsoft Exchange Server – SMTP Send and Recieve Connectors
For the communication to work correctly with Microsoft 365 Exchange Online, TLS must be enabled on the Send and Receive Connectors which use the certificate for the purposes of authenticating the SMTP connections to and from the on-premise Exchange Server(s).
Set TLSCertName Variable
Get hold of the thumbprint from the GUI, then:
$TLSCert = Get-ExchangeCertificate -Thumbprint "7A46B8F6DDA3F258A498F78A9C3280ECE2E9D847"Get the certificate Issuer and Subject and load into a variable for use when applying the certificate to the Send and Receive Connectors.
$TLSCertName = "<I>$($TLSCert.Issuer)<S>$($TLSCert.Subject)"Set TLS Certificate on Send Connector (SEND)
The Send Connector called “SEND” is used to send email to the EXIM Mail Relay Servers (which are authoritative for the SMTP namespace). The connector is considered “global”, i.e. they are not server specific and apply to all routing in the Exchange organisation.
Note we don’t set a TLS Certificate on the connector called “SEND” which is used to send to the EXIM Mail Relay servers, therefore there are no steps to complete.
Set TLS Certificate on Send Connector (Microsoft 365 – Outbound to Office 365 – 12345567-1234-49d6-b8d7-a4baf80d9b37)
The Send Connector called “Outbound to Office 365 – 12345567-1234-49d6-b8d7-a4baf80d9b37” is used to send emails to mailboxes hosted in Microsoft 365, it is a scoped send connector, which means only emails to particular domains (i.e. those within the Exchange organisation) will use it. The connector is considered “global”, i.e. they are not server specific and apply to all routing in the Exchange organisation.
Find Send Connector Name
We first need to find the name of the scoped send connector, used to send to emails to mailboxes that are hosted in Microsoft 365, so we do the following:
get-sendconnectorYou’ll get an output such as:
[PS] C:\Windows\system32>get-sendconnector

Identity                                                      AddressSpaces                            Enabled
--------                                                      -------------                            -------
SEND                                                          {SMTP:*;1}                               True
Outbound to Office 365 -12345567-1234-49d6-b8d7-a4baf80d9b37 {smtp:MYDOMAIN.mail.onmicrosoft.com;1} True
We are looking for the one called: “Outbound to Office 365 – 12345567-1234-49d6-b8d7-a4baf80d9b37”.
Configure
You now configure the TLS Certificate for the Microsoft 365 Send Connector using the variable we populated earlier.
Set-SendConnector "Outbound to Office 365 - 12345567-1234-49d6-b8d7-a4baf80d9b37" -TlsCertificateName $TLSCertNameYou may then need to perform an IISRESET, by running “IISRESET”, however, this may not be required.
Verify
Verify its changed by checking with:
[PS] C:\Windows\system32>get-sendconnector "Outbound to Office 365 - 12345567-1234-49d6-b8d7-a4baf80d9b37" | Format-List Name,TlsCertificateName


Name               : Outbound to Office 365 - 12345567-1234-49d6-b8d7-a4baf80d9b37
TlsCertificateName : <I>CN=R13, O=Let's Encrypt, C=US<S>CN=www.mydomain.com
Set TLS Certificate on Receive Connector
The Receive Connectors are used by the on-premise Exchange Servers to receive email from the other email servers, this might be Microsoft 365 or it may be the on-premise EXIM Mail Relay Servers, either way they need to be TLS secured. The Receive Connectors however are not “global”, they are specific to each Exchange Server, so therefore need to be configured individually.
Find Receive Connector Names
Run the following command to find all the receieve connectors within the Exchange Organisation.
get-receiveconnectorWe are interested only in the ones called: “<Exchange Server Name>\Default FrontEnd <Exchange Server Name>”.
Configure
Now we have all the names of the receive connectors, we update the TLS Certificate on all of these by running the following commands, these commands can be run from one Microsoft Exchange Server.
Set-ReceiveConnector "SERVER1\Default Frontend SERVER1" -TlsCertificateName $TLSCertName
Set-ReceiveConnector "SERVER2\Default Frontend SERVER2" -TlsCertificateName $TLSCertName
...
You may then need to perform an IISRESET, by running “IISRESET”, however, this may not be required.
Verify
Verify its changed by checking with:
[PS] C:\Windows\system32>get-receiveconnector "SERVER1\Default Frontend SERVER1" | Format-List Name,TLSCertificateName


Name               : Default Frontend SERVER1
TlsCertificateName : <I>CN=R13, O=Let's Encrypt, C=US<S>CN=www.mydomain.com
Repeat for each of the Receive Connectors for each of your Microsoft Exchange Servers.
It is also possible to verify that the changes have been successful by from another machine running the following command, and repeat this for each of the Exchange Servers in turn.
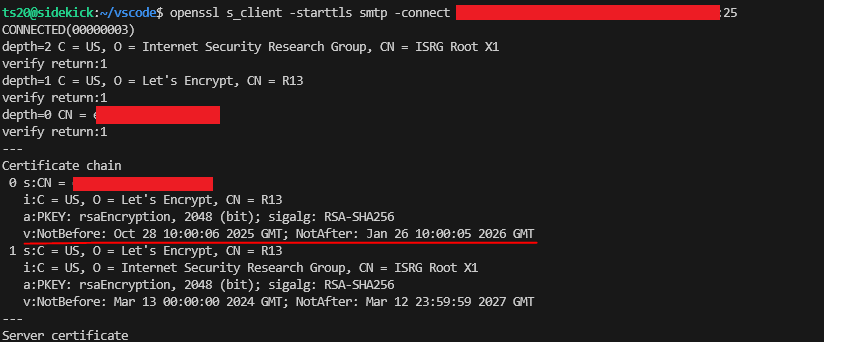
openssl s_client -starttls smtp -connect www.mydomain.com:25You will get an output like the following, here just look for the expected start and expiry dates of the certificate to verify it has been replaced and is in use as expected.
Microsoft Exchange Server – Delete Legacy Certificate
To avoid confusion we now need to delete the legacy certificate, doing that can be done by first identifying the old certificate, then by issuing a command to remove it, this will need to be repeated on all of the Microsoft Exchange Servers that are using the certificate.
It is recommended to export the certificate to a file before removal, so it could be recovered if required.
Find Legacy Certificate
We first need to find the certificate we want to remove by running this to obtain the Thumbprint value.
Get-ChildItem Cert:\LocalMachine\My | Select-Object Subject,Thumbprint,NotAfterYou’ll see an output such as the following:

Let’s say we want to remove the highlighted certificate, we’ll need to copy the Thumbprint attribute, in this example it is: C5000AC8BC98C46E70FFAB1CCAB897D606112345
Remove Certificate
To remove the certificate by running the following, it is strongly recommended to use Thumbprint, rather than the Subject because the Subject can be the same, but the Thumbprint will be unique.
$thumbprint = "C5000AC8BC98C46E70FFAB1CCAB897D606112345"

Remove-Item "Cert:\LocalMachine\My\$thumbprint"
Re-running the Get-ChildItem command should now show the certificate has been removed successfully.
Additional Information
- https://www.alitajran.com/renew-certificate-exchange-hybrid/
- https://learn.microsoft.com/en-us/exchange/architecture/client-access/renew-certificates
- https://learn.microsoft.com/en-us/exchange/architecture/client-access/import-certificates
- https://learn.microsoft.com/en-us/exchange/architecture/client-access/assign-certificates-to-services
- https://blog.admindroid.com/how-to-create-self-signed-certificate-using-powershell/
- https://learn.microsoft.com/en-us/exchange/architecture/client-access/import-certificates
- https://learn.microsoft.com/en-us/powershell/module/pki/import-certificate?view=windowsserver2025-ps
- https://learn.microsoft.com/en-us/powershell/module/pki/import-pfxcertificate?view=windowsserver2025-ps
1 thought on “Microsoft Exchange Server – Certificate Replacement”