
Containerisation is an increasingly popular method to deploy and run applications on both your computer but also for enterprise applications. Containerisation essentially bundles an application’s code with all the files and libraries it needs to run.
Having a layer of abstraction like this means that as long as you are running the same Operating System, then everything else is essentially taken care of, meaning you don’t need to worry about matching loads of different dependencies, packages and libraries within the environment that your application runs, that is all taken care of by the container.
In my previous article: Docker Install on Ubuntu 22.04.2 LTS we went through the installation of Docker on a Linux machine, in this article we’ll go into more depth
Running a Docker Container
Let’s start with a simple example. We first need to create the container, to do this we’ll run the following command to create the hello-world container. Note that this does not run the container, it just retrieves it from the image registry (more on this later) and readies it to be run.
docker container create hello-world:linuxAll being well you should see an alphanumeric string showing that it has been downloaded and saved successfully.
Let’s run the following, it will normally show running containers, in our case we’ve not started any; but we’ve added the “-a” so it will show all containers running or otherwise.
docker ps -aAnd in the output we can see:
ubuntu@development:~$ docker ps -a
CONTAINER ID   IMAGE                 COMMAND                  CREATED              STATUS                     PORTS     NAMES
5625528d15d8   hello-world:linux     "/hello"                 About a minute ago   Created                              romantic_snyder
Cool, that’s showing its created and ready, so lets run our container now. There’s three things you can do here, you can start the container with the terminal attached, or you can start the container without the terminal attached, but that means you need to examine the logs to see the output. Or you can use Docker Run to create the container, run it and attach to the terminal.
Option 1 – Run Container without Terminal Attached
From the previous output take the Container ID, and run the following:
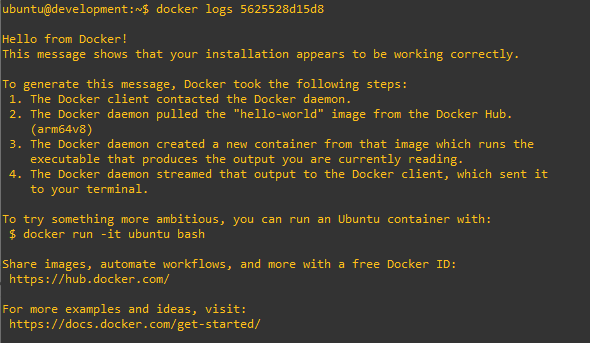
docker container start 5625528d15d8Assuming it runs okay, all you’ll get is that Container ID echoed back to you. To see what actually happened we then need to examine the logs with:
docker logs 5625528d15d8And we get the output as follows:
Option 2 – Run Container with Terminal Attached
The other approach is to run the container with the terminal attached as follows:
docker container start --attach 5625528d15d8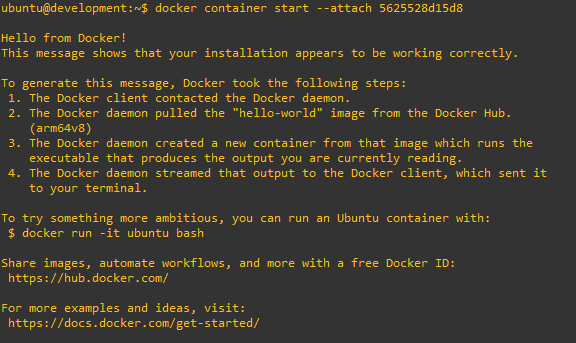
As you can see in this case the output is put straight to the screen, which option you choose, well, that is down to what your application needs.
Option 3 – Use Docker Run
docker run hello-world:linuxAs you’ll see with this you’ll get the result printed to the terminal. You’ll also notice that you didn’t need to refer to the Container ID, but what “Docker Run” does is to create the container and run it, which means you’ll end up with a number of containers created which you can see with “docker ps -a”, for example:

Running a Container in the Background
To run a container in the background use the below, referring to the Container ID from the examples above.
docker run -d 5625528d15d8Viewing Running Containers
To see containers as they are running you can use “docker ps”, this shows you containers that are currently running.
docker psCleaning-Up Old Containers
Okay, so we’ve run a few containers and there’s a few of them starting to build up, we want to clear these away now, as they aren’t needed anymore.
So first run:
docker ps -aThen get the Container ID of the container you wish to delete, the container needs to be stop to run this.
docker rm <Container ID>(Add a “-f”, so “docker rm -f <Container ID>” to remove a running container.)
Stopping a Container
To stop a running container, you first obtain the Container ID, then run the following to stop the container from running.
docker stop <Container ID>(Add a “-t” to force stop the container)
Creating Your Own Docker Container
Let’s create a simple web-server container, so we can use it across the network in the following section. We’re not running Apache or the like, instead we’ll just use netcat to return a page to illustrate the point.
Creating a Docker container, requires that you create a Dockerfile that specifies what the container will look like, i.e. what packages are needed and so forth in the form of an image. You then also need a specify the “Entrypoint” which is what is started when the container starts (in simple terms).
nc-web-server.Dockerfile
FROM ubuntu

USER root
COPY ./nc-web-server.bash /

RUN chmod 755 /nc-web-server.bash
RUN apt -y update
RUN apt -y install bash netcat

USER nobody

ENTRYPOINT [ "/nc-web-server.bash" ]
Once created we now need to create the bash file that essentially behaves like a web server by responding to a request using netcat (nc) and gives a simple HTML page in response.
nc-web-server.bash
#!/usr/bin/env bash

webserver() {
  echo "Netcat Web Server ready, access: http://localhost:5000 or http://<Server IP>:5000"

  serveroutput=$(echo "<html><body><p>Web Site Output: $(date)</p></body></html>")

  length=$(wc -c <<< "$serveroutput")

  content="\
HTTP/1.1 200 OK
Content-Length: $((length-1))

$serveroutput"

  while true
  do echo -ne "$content" | nc -l -p 5000
  done
}

webserver
Now we can build the Docker container image with:
docker build -t nc-web-server -f nc-web-server.Dockerfile .Let’s quickly explore this. So the “-t” names the image, the “-f” specifies the Dockerfile with the instructions to build the image, the full stop afterwards specifies the working directory of the build command, in this case the current directory (i.e. “.”) where it will be able to find the nc-web-server.bash file which is needed for the build.
Once completed run the following to show the list of images:
docker imagesAnd there you can see the image has been created successfully and is ready to be run.

Running a Docker Container and Accessing Across the Network
In this example, we have a web server container called “nc-web-server”, the container is configured to listen on port 5000/TCP, however we need to expose it to the outside world, i.e. expose it to your local network and to do that on another port. So when we run it we need to specify the ports with “-p”, so the format is Outside Port:Inside Port and in this case: 8080:5000.
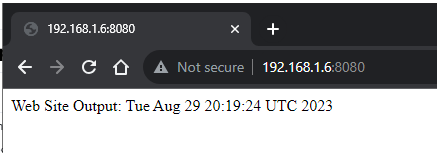
docker run -d -p 8080:5000 nc-web-serverOnce run, we should find that the web server is now listening on port 8080 on your machine’s IP address, in my case my machine’s IP address is 192.168.1.6, but in the below you can see its listening on 0.0.0.0:8080, what this means is any IP address on your machine.

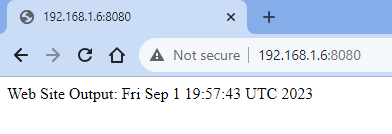
Now let’s access the web server with a web browser…..and bingo, we’re in.
We now have our simple web server running in a docker container on our machine. Of course this is just an example, but you can see how this could be very useful.
Imagine you have your web application within a Docker container, its currently running v1.0, you want to upgrade to v1.1, all you need to do is prepare a new container, test it, and when you’re ready swap the containers over; if you find a problem, just swap it back again!
Persistence
So having a Docker container that you can just run and stop is fine, but what if you need data (files) to persist between you stopping and starting a container. Perhaps you want the container to pull in files as it starts, or you want it to perform an action and write a result for some future container to be able to use.
No problem, that’s where persistence comes in.
There are two ways to do this which we’ll explore in this section.
- Mount a Local Directory
- Using Docker Volumes
Option 1 – Mount a Local Directory
Let’s run a basic Ubuntu container in this way and get it to echo some data to a file, which we’ll want to persist after the container has finished running. Now, in your home directory on your machine, let’s create a directory which we’ll present within our container when it runs.
mkdir ~/cont-data
cd ~/cont-data

docker run --rm --entrypoint sh -v /home/ubuntu/cont-data:/tmp ubuntu -c "echo 'Persistent data' > /tmp/persist && cat /tmp/persist"
Okay so let’s examine the command above. The main part is the “-v /home/ubuntu/cont-data:/tmp” argument, what this means is that the directory on our machine i.e. the /home/ubuntu/cont-data is being mapped to the /tmp directory within the container.
And what we can find is that there is a file within our home directory /home/ubuntu/cont-data called “persist” which has the “Persistent data” text string within it. And this persists after the container finishes running.
It’s also worth noting that this is a 2 way synchronised directory. i.e. the file changed on the host is changed within what the container can see and vice versa.
Option 2 – Using Docker Volumes
Another way to do this is to use a Docker Volume, this is similar to the previous method except you’re created an abstracted volume rather than just presenting a directory (into the container), thus allowing more separation from the host’s specifics (which may or may not exist).
The Docker Volume is also isolated from the host’s storage. If you need a persistent place to store data going to and from your container, but without needing to be seen or changed by your host system, this is an approach you can use.
docker volume create mydockervolThen run the container and this time rather than specifying a path (after the -v) you specify the name of the Docker volume, as so:
docker run –rm –entrypoint sh -v mydockervol:/tmp ubuntu -c “echo ‘Persistent data’ > /tmp/persist && cat /tmp/persist”
Let’s see what it did:
docker volume lsAnd there you can see the Docker volume has been created:
ubuntu@development:~/cont-data$ docker volume ls
DRIVER    VOLUME NAME
local     mydockervol
If we wanted to see the actual data, we first need to find where the data really is with:
ubuntu@development:~/cont-data$ docker volume inspect mydockervol
[
    {
        "CreatedAt": "2023-08-31T21:12:24+01:00",
        "Driver": "local",
        "Labels": null,
        "Mountpoint": "/var/lib/docker/volumes/mydockervol/_data",
        "Name": "mydockervol",
        "Options": null,
        "Scope": "local"
    }
]
Then with sudo we can actually show the directory and inspect the file within.
$ sudo -s
# cd /var/lib/docker/volumes/mydockervol/_data
# ls -la
total 12
drwxrwxrwt 2 root root 4096 Aug 31 21:12 .
drwx-----x 3 root root 4096 Aug 31 21:12 ..
-rw-r--r-- 1 root root   16 Aug 31 21:12 persist
To delete the Docker volume all you need to run is a cheeky:
docker volume rm mydockervolDocker Container Registry
A container image registry is a service that allows you to store images that you can then call upon and run the container at a later date. The Container image tags consists of its name, a colon and then its version (and it defaults to “latest” if no version number is provided.
Docker Hub is a registry you can use with the Docker. I’m going to assume that you’ve already setup a Docker Hub account, so if you’ve not done that go and do that now.
Login to Docker from Docker CLI
To login run the following, enter your Docker Hub username and password:
docker loginThe credentials are saved into your home directory for future use.
Push an Image to the Registry
We’ll take the image and then rename it, then we can upload it to the Docker Hub registry.
docker tag nc-web-server geekmungus/nc-web-server:1.0.0
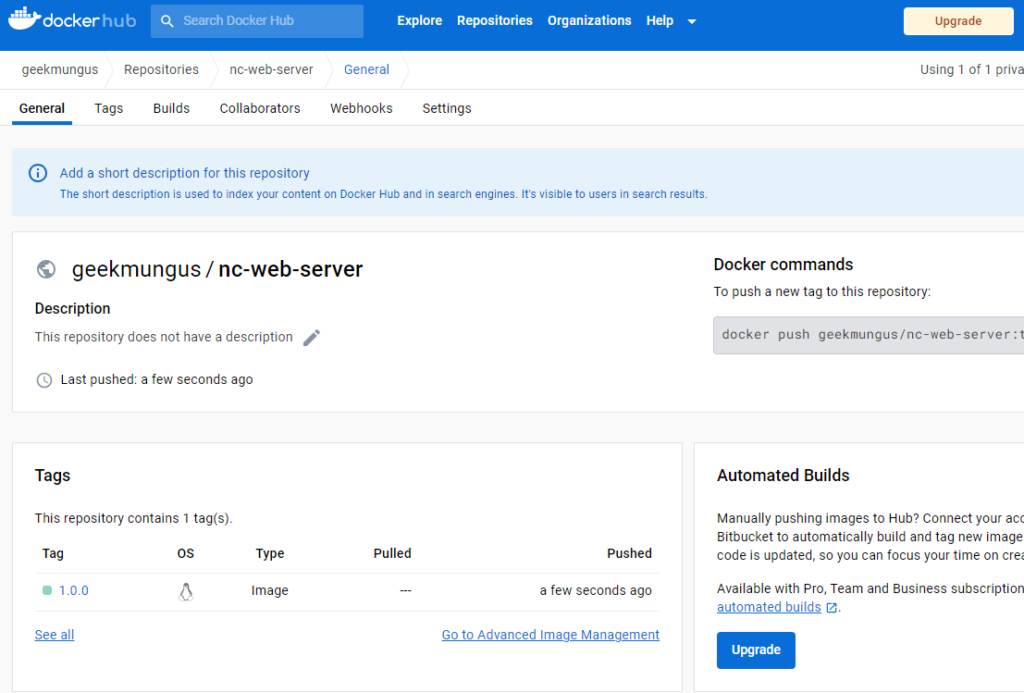
docker push geekmungus/nc-web-server:1.0.0You’ll now see it start to upload:
ubuntu@development:~$ docker tag nc-web-server geekmungus/nc-web-server:1.0.0
ubuntu@development:~$ docker push geekmungus/nc-web-server:1.0.0
The push refers to repository [docker.io/geekmungus/nc-web-server]
5ebe31cc7a4e: Pushed
d96d02bfe339: Pushing [===============>                                   ]  12.71MB/40.25MB
5634744e4c7d: Pushed
2182c773bb4b: Pushed
1b9698f962dc: Mounted from library/ubuntu
When completed, we can then see it in the registry, ready for use.
If you want to upload a new version, just tag the image with an updated version number and then upload, for example geekmungus/nc-web-server:1.0.1 in my case.
Pull an Image from the Registry
In this final task, we’ll pull an image from the registry. To ensure the (nc-web-server) image is not present in the local cache, we’ll delete it, we may need to stop the running container first, but then we’ll be able to pull down a new copy.
Firstly run “docker ps” and get the Container ID of any container that is using the nc-web-server image, then run the following command to stop it.
docker stop <Container ID>Now delete the image:
docker images
docker rmi <Image Name>
(e.g. “docker rmi nc-web-server” or “docker rmi geekmungus/nc-web-server”)
Right now we can pull down the image, let’s pull down the latest nc-web-server image we pushed up, so the image: geekmungus/nc-web-server:1.0.1
ubuntu@development:~$ docker pull geekmungus/nc-web-server:1.0.1
1.0.1: Pulling from geekmungus/nc-web-server
db76c1f8aa17: Already exists
978d20ea8b1d: Already exists
639eb43d03dd: Already exists
4f45d942f960: Already exists
92c89c6f91e2: Already exists
Digest: sha256:aaa4c84cf3273203a1e9acc96342bc437d200d63b482395f5c852f941bd9ba4a
Status: Downloaded newer image for geekmungus/nc-web-server:1.0.1
docker.io/geekmungus/nc-web-server:1.0.1

ubuntu@development:~$ docker images
REPOSITORY                    TAG       IMAGE ID       CREATED        SIZE
geekmungus/nc-web-server      1.0.1     0f51daf29ec1   3 days ago     111MB
ubuntu                        latest    a2f229f811bf   4 weeks ago    69.2MB
And there you go its been downloaded, and is available, for a quick test, lets fire up that container again:
docker run -d -p 8080:5000 geekmungus/nc-web-server:1.0.1Check it is running:
ubuntu@development:~$ docker ps
CONTAINER ID   IMAGE                            COMMAND                 CREATED         STATUS         PORTS                                       NAMES
47e9b96e1b17   geekmungus/nc-web-server:1.0.1   "/nc-web-server.bash"   5 seconds ago   Up 4 seconds   0.0.0.0:8080->5000/tcp, :::8080->5000/tcp   kind_almeida
And we can access the website:
Conclusion
We’ve seen how to run some Docker containers to use functions of these applications, wrapping your application up in its own container can be very helpful in terms of deployment (you don’t have to worry about building the exact environment for the application to run in), but also in terms of its support and operation in the long term. For example, if you’re running your version 1.0 and want to upgrade to version 1.2, previously this would require a re-installation of the application, if anything went wrong rolling back the change may be very difficult; however with a container, you just stop the version 1.2 container and start the version 1.0 container again.
When you’re running at enterprise scale you’ll be using something like Docker Swarm or Kubernetes to manage the orchestration of containers and running them in a manageable way.
Stay tuned for further containerisation articles in future.