DNS name resolution is essential to modern connectivity. The ability for hosts to be able to quickly and reliably resolve DNS domain names (e.g. www.google.com) to their IP address equivalents (e.g. 216.58.204.68 or 2a00:1450:4009:827::2004) to connect and consume services ensures consistent and performant network flows. Due to the essential nature of DNS, DNSSEC is an addition to DNS that provides a layer of security, specifically around the providing a mechanism whereby a client querying DNS for a DNS domain name record can be sure (almost 100% sure) that the answer it gets back is valid and hasn’t been tampered with; the following documentation explains what DNSSEC is, how its various facets work, how to configure it using AWS Route53.
What is DNSSEC and How Does DNSSEC Work?
DNSSEC is a layer of security added to all DNS records (of a DNSSEC signed zone), the digital signatures are stored alongside the existing records (i.e. A, AAAA, CNAME etc.) by checking the associated signature to the DNS record, you can be confident that the result you get is valid and unaltered en-route to you. Of course, if the signature didn’t match you would then be able to infer that something/someone is trying to inject incorrect records in an effort to redirect your client to a different site or IP for nefarious means; in essence it makes a person-in-the-middle (PiTM) attack using DNS virtually impossible.
As mentioned, DNSSEC signs the zone and its DNS records within, creating signatures for each. If we examine an example domain (zone) and then work from there to what DNSSEC does and how it works.
Let’s say we have the domain/zone coffeeshop.com, within this zone we have an apex A record coffeeshop.com which points at our two web server IP Addresses, we also have two “www.coffeeshop.com” A records that each points to our web server IP Addresses, we have a “mail.coffeeshop.com” A record that points at our email server IP address and finally an MX record “MX 10 mail.coffeeshop.com” that points at the A record mentioned previously.
We’ll now step through the name resolution process and explain how DNSSEC is incorporated to add this layer of security that allows a client to confidence that they are:
- getting a DNS result from who they think is the correct source (authenticated),
- getting a DNS result that is correct, i.e. what the authoritative source intended and not altered in transit.
Let’s examine an example name resolution using our coffeeshop.com domain.
NOTE: A “DNSSEC Aware” DNS recursive server (resolver) is typically pre-configured with the public key of the root zone (.), which is called the “Trust Anchor”. The Trust Anchor means the resolver implicitly trusts the records that the root zone provides, so does not need (nor could it) verify this by use of the parent zone, because it doesn’t have one! Essentially you and your DNS recursive server (resolver) trust ICANN and its procedures to keep the root keys safe. So, let’s dig in….

1. The client makes a request for an A record for a domain, for example www.coffeeshop.com from its local DNS recursive server.
2. The local DNS recursive server (resolver) in this case doesn’t have a cached entry for coffeshop.com, so it makes a connection to one of the 13 Root DNS servers that hold the root (.) zone, the root (.) zone holds the records of where the authoritative Name Servers are for the TLD zone (.com), so it returns this, but additionally with DNSSEC it also returns the DS Record(s) for the .com zone.
3. Because A/the DS Record(s) have also been returned with the DNS response, the resolver knows that the .com zone is a DNSSEC-secured zone. It also implicitly trusts this result to be “true” because of the built in trust of the root zone (.) which was explained in the tip above.
4. The local DNS recursive server (resolver) now queries the Name Servers for the TLD zone (.com) for the coffeeshop.com zone, the .com not being authoritative for that zone provides: 1. Name Server Record(s) for the coffeshop.com zone, 2. DS Record(s) for the coffeeshop.com zone.
5. The local DNS recursive server (resolver) hashes the KSK (Key Signing Key) of the TLD zone (.com) and compares this with the DS Record of the TLD zone (.com) it received from the root (in step 2), the DS Record also being a hash of the KSK of the TLD zone (.com).
6. If the hash matches the DS Record, the resolver knows that the records provided by the TLD zone (.com) can be trusted, i.e. that the KSK used to sign the ZSK (Zone Signing Key) which is in turn used to sign the DNS records within the TLD (.com) zone are valid.
7. Next the local DNS recursive server (resolver) now queries the authoritative Name Servers for the coffeeshop.com zone for the www.coffeeshop.com A record it wanted, this provides 1. www.coffeeshop.com A record result, 2. the RRSIG (signature) of the A record and 3. the ZSK used to sign the coffeeshop.com zone and the records within.
8. Now the local DNS recursive server (resolver) hashes the KSK (Key Signing Key) of the coffeeshop.com zone, and compares this with the DS Record of the coffeeshop.com zone which it received in step 4.
9. If the hash matches the DS Record, the local DNS recursive server (resolver) knows that the records provided by the coffeeshop.com zone can be trusted, i.e. that the KSK used to sign the ZSK which is then used to sign the DNS records within the coffeeshop.com zone are valid.
10. Now the local DNS recursive server (resolver) uses the coffeeshop.com ZSK (Zone Signing Key) along with the RRSIG of the www.coffeeshop.com DNS A Record (RRset) to verify that the contents of the A record are 1. authenticated, came from the coffeeshop.com owner, 2. valid, are correct and have not been tampered with in transit, all of which goes up that “chain of trust” to the root.
11. The local DNS recursive server (resolver) would then return the www.coffeeshop.com A Record result to the client for use to make the connection; to the web server for example.
If however, that “chain of trust” is broken at one or more points in the chain, for example because the resolver can’t validate the signature of the www.coffeeshop.com DNS A Record against the coffeeshop.com’s ZSK, it would mean that the value in the A Record is different, i.e. its value being different, means a different signature, and one that would not match what is expected, which means the result has been forged (poisoned) and should be discarded. The client in this situation would not get a result, i.e. NXDOMAIN, because the “DNSSEC Aware” resolver would not knowingly return a record that failed validation; additionally depending on the resolver configuration, it may ensure the correct result is provided.
There’s more to learn and consider so here’s some additional links:
- https://dzone.com/articles/protect-your-domain-with-dnssec#:~:text=To+enable+DNSSEC+on+Route53,registrar+and+another+domain+registrar.
- https://dnssec-analyzer.verisignlabs.com
- https://www.cloudflare.com/en-gb/dns/dnssec/how-dnssec-works/
- https://dnsviz.net/
- https://www.cyberciti.biz/faq/unix-linux-test-and-validate-dnssec-using-dig-command-line/
- https://bluecatnetworks.com/blog/breaking-down-dnssec-how-does-it-work/
- https://dnssec-tools.org/
DNSSEC Example using AWS Route53
Let’s illustrate it with a real world example using AWS Route53, I’m assuming that you’ve already created a Route53 DNS hosted zone and adding your records, and that you have your domain using the AWS Route53 Name Servers for resolution.
Step 1 – Sign the Zone
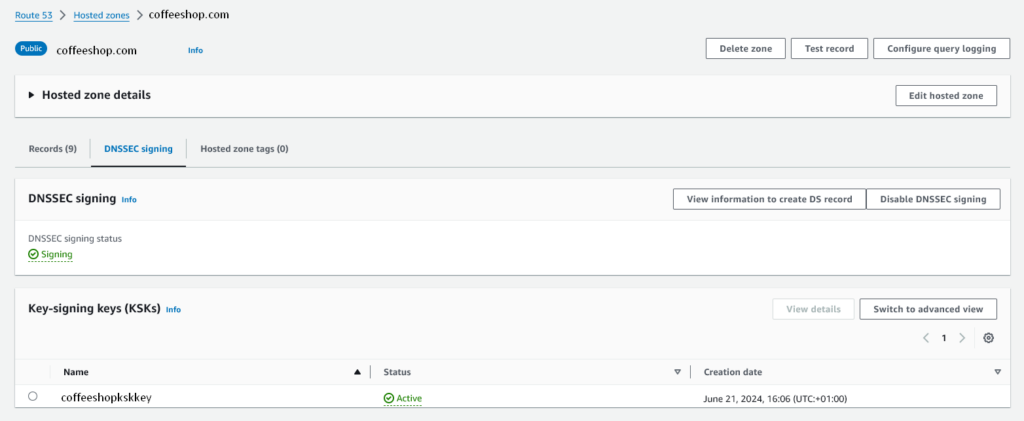
So first step we need to sign the zone. Route53 -> Select the zone you wish to sign, then click “View Details”.

Now click on the “DNSSEC Signing” tab above the records, then click “Enable DNSSEC Signing”.

Select “Create a new KSK”, then enter a suitable name for your Key Signing Key (KSK), we’re using AWS KMS to manage the key in this case. We’re using the name “coffeeshopkskkey“.
Then select “Create customer managed CMK”, then enter a name, we’re using the same: “coffeeshopkskkey“, then click “Create KSK and enable signing”.

All being well you should see that the zone is signed and the active KSK is the one you just created.

Now we have our zone signed, we can move to the next step.
Step 2 – Publish the DS Record
As mentioned earlier, we need to now take the hash of the KSK and provide that to the parent zone (i.e. .com) typically via your domain registrar, who will publish that into the parent zone by way of the DS Record.
We’re assuming an external domain registrar, i.e. not using AWS Route53 as the registrar, instead someone else, like 123reg or GoDaddy.
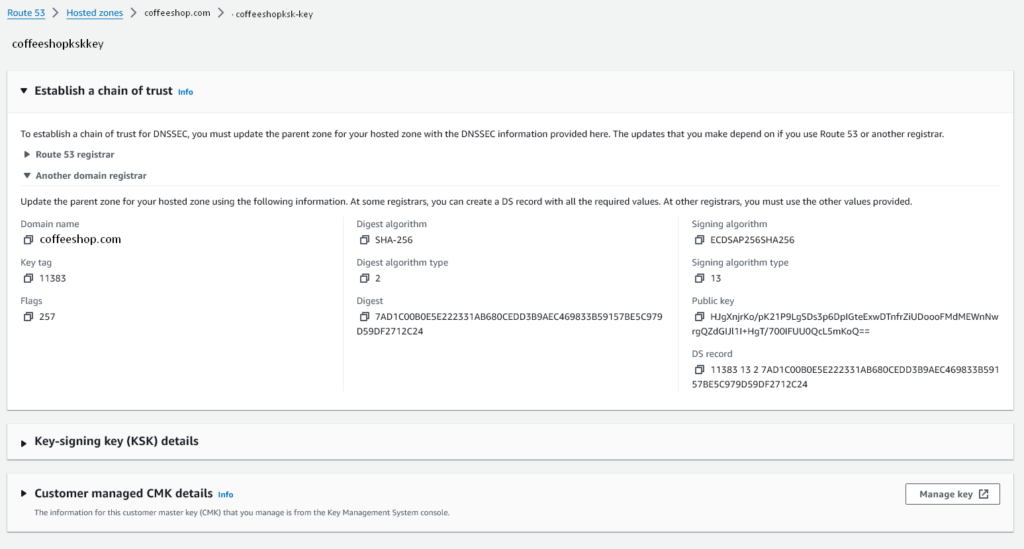
So to get this information, click the “View Information to create DS Record”, then expand the section: “Establish a chain of trust”, then expand the section: “Another domain registrar”.

Submit the required information in the form your registrar requires, however normally all you’d need is the “DS Record” which is in a format like:
11383 13 2 7AD1C00B0E5E222331AB680CEDD3B9AEC469833B59157BE5C979D59DF2712C24The first number being the ID/Key Tag, the second being the Algorithm, the third being the Digest Type (i.e. SHA1/SHA2) and finally the Digest.
Once the DS Record is added by the registrar to the parent zone (.e.g. .com), we’re pretty much there. Our zone has been signed, we’ve then established the the “chain of trust” by providing the DS Record to the parent zone, now all is left is to perform some tests.
Step 3 – Testing!
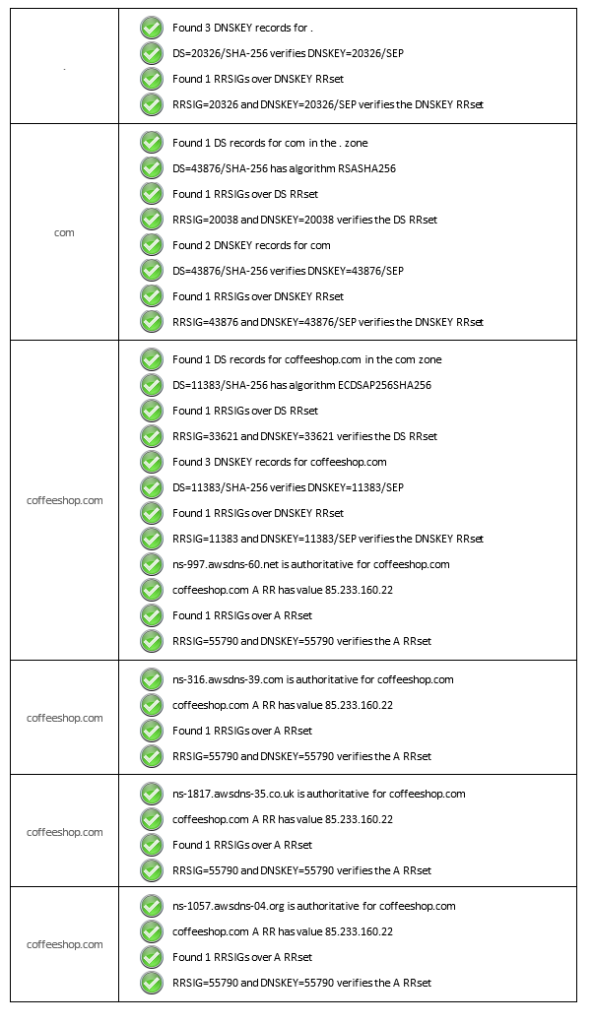
So how do we know its all configured correctly. There’s plenty of ways to test, a good way I’ve found is to use the Verisign Labs DNSSEC Analyser. https://dnssec-analyzer.verisignlabs.com
Let’s examine an example output, as you can see we’ve got the root zone, which has three DNSKEY records, which are all signed in one RRset. Then we have the .com zone, its shown that there is the DS Record for the .com zone in the . (root) zone, so we can see that part of the chain is there.
Moving on we see the coffeeshop.com zone has the DS Record in it’s parent zone (.com), so there we also have the chain of trust present. We can also see that the coffeeshop.com zone has been signed and there are three DNSKEY records (two ZSKs – 256 and one KSK 257). We can also see the apex A record has been signed and a RRSIG is present for it.
Overall, all looks good.

Conclusion
Hopefully this article has given you a brief idea of DNSSEC works, and how you can use DNSSEC to secure your own DNS zone. You’re not encrypting the zone records, you’re signing them. Any users querying your zone for DNS Record with a DNSSEC aware DNS resolver will now see the signatures of all your records and be able to verify they are what you intended, and therefore can use them with confidence.
DNSSEC is still not widely implemented (citation) a report from 2023 put the figure at ranging from 4% up to about 40% of all domains depending on the TLD; however with information security becoming more and more important, and some security standards requiring it, its only a matter of time before it becomes more mainstream.

Verifying DNSSEC – Using the Command Line
From a Linux machine you can perform the steps to verify DNSSEC, you can use “dig” but some of the bits of it have been deprecated, the approach now recommended is to use “delv”. Firstly install “delv” which is in the bind9utils package on Ubuntu Linux 22.04.
# sudo apt install bind9utils
Verify DNSSEC Using “delv”
Let’s validate the domain coffeeshop.com, i’m specifying the resolver with the “@”, but you may not need this.
$ delv @8.8.8.8 coffeeshop.com +yaml A
type: DELV_RESULT
query_name: coffeeshop.com
status: success
records:
– fully_validated:
– coffeeshop.com. 27718 IN A 1.62.2.1
– coffeeshop.com. 27718 IN A 1.62.2.2
– coffeeshop.com. 27718 IN RRSIG A 13 2 28800 20240628152410 20240624142410 57659 wgcuk.org. eECRFAcCsOyJNhB/2QUavbVQgxrtDR5rk+vtWTHKdG2RciLqSTRD/7Q5 /kMnCB88EKwK3eVEd9s3vCZGzDvSzQ==
Let’s explore the result. We queried for the apex A record for the zone wgcuk.org and we get a successful validation of the result. The two apex A records are combined into an RRSET, which is the RRSIG record. In this case the validation has been successful, which means the DNS query result we are seeing has not been tampered with.