
The document provides a simple guide to how to install and use the Microsoft Exchange Online PowerShell modules to interact with Microsoft 365 infrastructure for the purposes of administering the Microsoft 365 infrastructure and applications; i.e. how to setup your Developer Machine.
You may be able to install modules without administrative rights by adding the “scope” argument, for example:
Install-Module -name <whatever> -scope CurrentUserThe installation of the Microsoft Exchange Online Management PowerShell modules can be a bit involved.
Step 1 – Install Module(s)
There are a few steps to perform:
Install-Module PowerShellGet -ForceIf you see the error “Error: PowerShellGet Requires NuGet….”
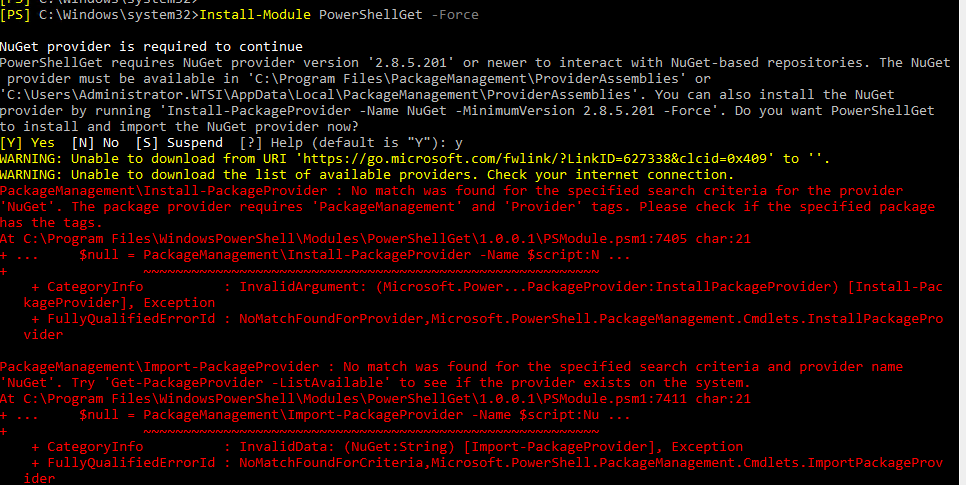
To resolve run:
[Net.ServicePointManager]::SecurityProtocol = [Net.SecurityProtocolType]::Tls12Then run:
Install-PackageProvider -Name NuGetYou may also need to run:
Install-Module PowerShellGet -Force -AllowClobberNow, you are ready to install the Microsoft Exchange Online module. So let’s do that.
Install-Module ExchangeOnlineManagementYou can also add on the end -Scope CurrentUser to avoid needing administrative permissions.
The installation may take a few minutes.
Upgrade (if Required)
To upgrade the existing version you can run:
Update-Module -Name ExchangeOnlineManagementTo verify its upgraded to the expected version you can run:
Get-InstalledModule ExchangeOnlineManagementYou’ll get an output such as:

Step 2 – Example Connection
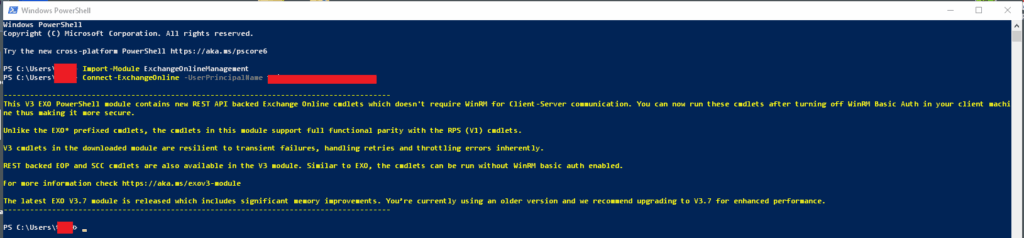
Once the module is installed, you can then use it, however you may need to import it before you can use it.
Import-Module ExchangeOnlineManagementRemember PIM, if you require elevated permissions, ensure you have elevated permissions via PIM before you complete these steps.
Now we can make the connection:
Connect-ExchangeOnline -UserPrincipalName <UPN> [-ExchangeEnvironmentName <Value>] [-ShowBanner:$false] [-DelegatedOrganization <String>] [-SkipLoadingFormatData]Here’s a simple example connection command:
Connect-ExchangeOnline -UserPrincipalName fred.bloggs@domain.comYou may be redirected to your organisation’s SSO to enter your passowrd, and challenged for MFA response.
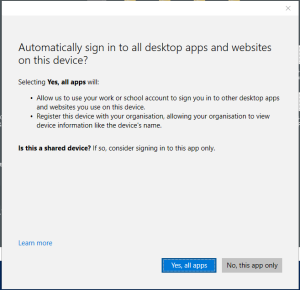
If you are prompted for signing in all desktop apps, click on “No, this app only”, we only want to use this user session with our PowerShell window.
Once successfully connected you should see:
Step 3 – Perform a Test Query
Let’s perform a test query to retrieve all the mailboxes within our Microsoft Exchange Online environment, spoiler alert, we only have 2 in our case!
get-mailboxAnd we get this output:

Step 4 – Disconnect
Once you’ve finished your work, you then need to disconnect, although not essential it is recommended, omit the “-Confirm:$false” if you wish to be prompted.
Disconnect-ExchangeOnline -Confirm:$false