As a test we are using OpenSSL to perform some credentials testing using an Enterprise Application configured in Microsoft 365 to connect using IMAP(S) and SMTP via OpenSSL to validate how OAuth modern authentication works.
Create Enterprise Application
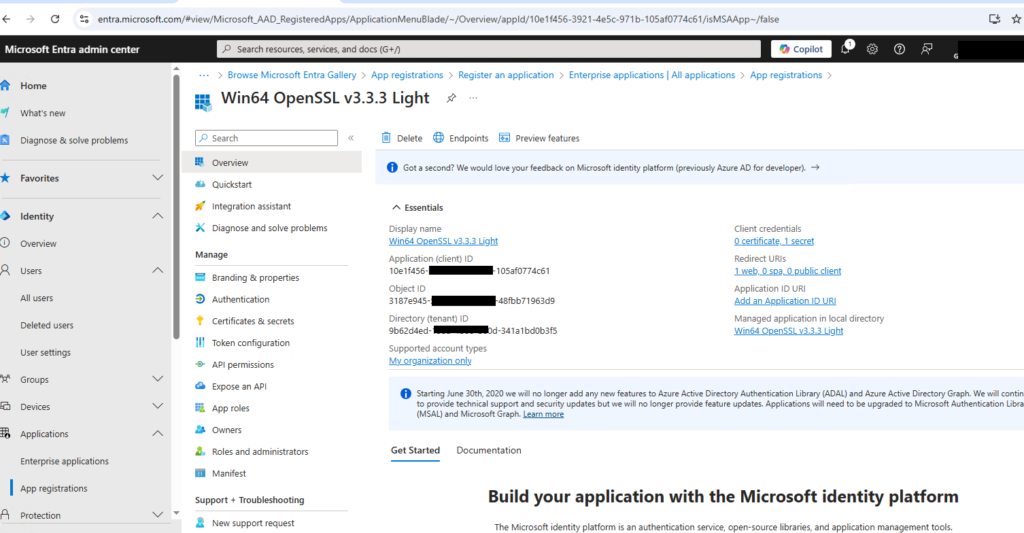
Firstly we create an Enterprise Application, we are going to be using Win64 OpenSSL v3.3.3 Light on our test machine, but in a way that doesn’t really matter.
Add the Permissions for the Application.
It’s a little bit tricky. Instead of Microsoft Graph select the “APIs my organization uses” and search for “Office 365 Exchange Online”
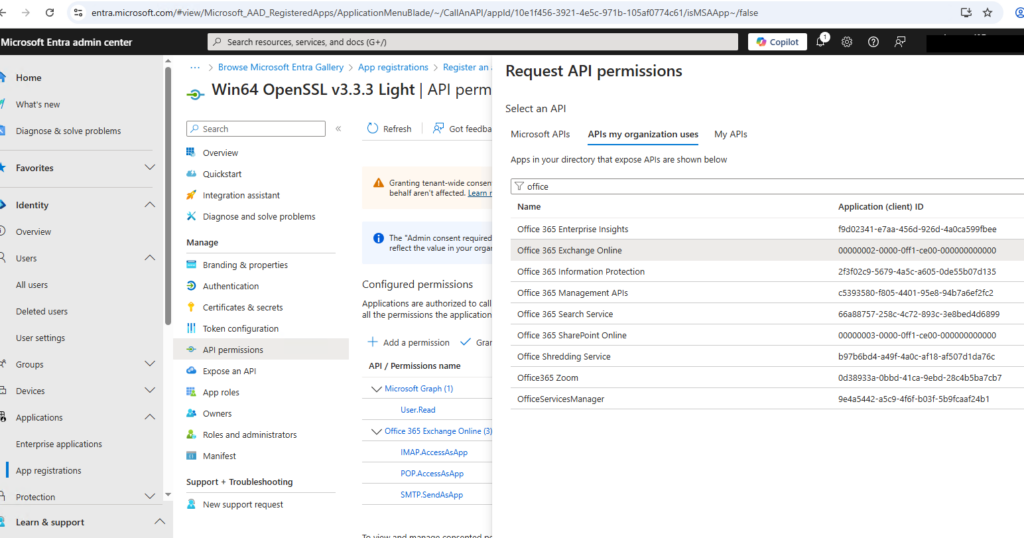
Then select “Application permissions” and search for “POP” and “IMAP” and “SMTP” Office 365 Exchange Online
- IMAP.AccessAsApp
- POP.AccessAsApp
- SMTP.SendAsApp
Once completed that is the Enterprise Application configured.
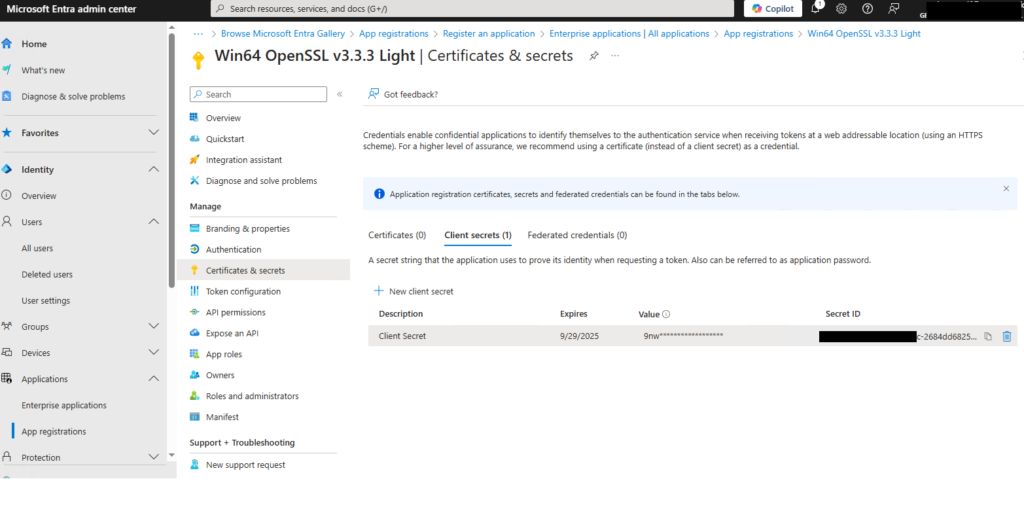
Create Enterprise Application Secret
Now we need to create a “Client Secret” for the Enterprise Application, so click on “Certificates & Secrets”, then create “New Client Secret”, we’ll need this value later on when we come to generating the OAuth token. Note that when you create the secret, you need to take the value of the key, and this will then not be visible, also bear in mind this is effectively a password, so keep it safe!
Create Exchange Online Service Principal
Now you need to create the Service Principal in Exchange Online. The Service Principal in Exchange Online allows the Enterprise Application to interact with objects (e.g. Mailboxes) within Exchange Online.
To create the Service Principal you use the following command:
New-ServicePrincipal -AppId $AppID -ServiceId $objectID [-Organization $TenantID]So what are all these variables? You can find these from the Application “Overview”.

Identified above as per their colours:
- Application (Client) ID (Red)
- Service ID / Object ID (Green)
- Directory (Tenant) ID (Blue)
So substituting in the values for our particular example:
New-ServicePrincipal -AppId 10e1f456-3921-1234-1234-105af0774c61 -ServiceId 3187e945-569d-1234-1234-48fbb71963d9 -Organization 9b62d4ed-1234-1234-b00d-341a1bd0b3f5 -DisplayName "EXO Serviceprincipal Win64 OpenSSL v3.3.3 Light"The Organisation ID is option from what we can tell.
You can also create via PowerShell, to do this you need to ensure you have the MS Graph and Exchange Online PowerShell Modules installed and active.
Connect-MgGraph -Scopes 'Application.Read.All'

$ServicePrincipalDetails = Get-MgServicePrincipal -Filter "DisplayName eq 'Win64 OpenSSL v3.3.3 Light'"
$ServicePrincipalDetails

Connect-ExchangeOnline
New-ServicePrincipal -AppId $ServicePrincipalDetails.AppId -ServiceId $ServicePrincipalDetails.Id -DisplayName "EXO Serviceprincipal $($ServicePrincipalDetails.Displayname)"
Note that: “Get-MgServicePrincipal” retrieves the list of Enterprise Applications, “Get-ServicePrincipal” retrieves the list of Exchange Online Service Principals.
Right, now we can check it has been created OK, that would be a yes.
PS C:\Users\Administrator.BLAH> get-serviceprincipal

DisplayName                              ObjectId                                                                                      AppId
-----------                              --------                                                                                      -----
EXO Serviceprincipal Win64 OpenSSL v3... 7e9d0608-db24-1234-1234-c8d03424192d                                                          10e1f456-1234-1234-971b-105af0774c61
You’ll notice that the “AppId” value matches the Enterprise Application “Application (Client) ID”; which shows that link between the two.
Check (and Enable) IMAP, POP and SMTP on Account
In our example we using the account zh1@blah.org.uk, so we’ll check it first with:
Get-CASMailbox -Identity zh1@blah.org.ukAnd then apply the relevant settings (if required), its recommended to just run these anyway! We want POP, IMAP to be set to “True” and SMTPClientAuthenticationDisabled to be set to “False”.
Set-CASMailbox -Identity zh1@blah.org.uk -PopEnabled $true -ImapEnabled $true -SmtpClientAuthenticationDisabled $falseSet Permissions on Account
Now we need our Service Principal to have access to our mailbox, we apply this with the following:
$Mailbox = "zh1@blah.org.uk"
$ServicePrincipal = "EXO Serviceprincipal Win64 OpenSSL v3.3.3 Light"
Add-MailboxPermission -Identity $Mailbox -User $ServicePrincipal -AccessRights FullAccess -AutoMapping $false
We then should get the following:
PS C:\Users\Administrator.BLAH> Add-MailboxPermission -Identity $Mailbox -User $ServicePrincipal -AccessRights FullAccess -AutoMapping $false

Identity             User                 AccessRights                                                                                                               IsInherited Deny
--------             ----                 ------------                                                                                                               ----------- ----
128c533d-2f09-406... S-1-5-21-20157833... {FullAccess}                                                                                                               False       False
We can then check the permissions with:
$Mailbox = "zh1@blah.org.uk"
Get-MailboxPermission  -Identity $Mailbox | Where-Object { ($_.AccessRights -eq "FullAccess") -and ($_.IsInherited -eq $false) -and -not ($_.User -like "NT AUTHORITY\SELF") } | ft -AutoSize
All being well we should then see this if all is well.
PS C:\Users\Administrator.BLAH> Get-MailboxPermission  -Identity $Mailbox | Where-Object { ($_.AccessRights -eq "FullAccess") -and ($_.IsInherited -eq $false) -and -not ($_.User -like "NT AUTHORITY\SELF") } | ft -AutoSize

Identity                             User                                            AccessRights IsInherited Deny
--------                             ----                                            ------------ ----------- ----
128c533d-2f09-4063-816e-e7cf765a26e4 EXO Serviceprincipal Win64 OpenSSL v3.3.3 Light {FullAccess} False       False
We are now ready to start our tests!
Note that permissions application does not appear to be instant within Exchange Online, it can take up to 60 minutes, well it did for us, before the configuration took effect, although it appeared to have taken straight away when reviewing PowerShell output.
Get OAUTH Token
Now we need to get the OAUTH token which we’ll then use in the two upcoming tests. A script has been prepared for this, all you need to do is enter the relevant values for:
- $targetmailbox – The target mailbox, e.g. “zh1@blah.org.uk”.
- $clientId – The ClientID, which is the Application (Client) ID, note the red, that you discovered earlier.
- $tenantId – The TenantId you can obtain from the Entra ID Overview page, its your underlying “onmicrosoft.com” ID.
- The ClientSecret, but specifically the bit after “ConvertTo-SecureString” is where you subsitute the value you created in the section “Create Enterprise Application Secret” earlier.
You need to install the PowerShell modules (if not done so already):
Install-Module -Name MSAL.PS
Install-Module -Name JWTDetails
Then create a script called get-token.ps1:
Import-Module MSAL.PS
Import-Module JWTDetails

$targetmailbox = "zh1@blah.org.uk"
$clientId = "10e1f456-1234-1234-971b-105af0774c61"
$tenantId = "blahorguk.onmicrosoft.com"
$ClientSecret = ConvertTo-SecureString "<Secret Key in here>" -AsPlainText -Force
$Scope = "https://outlook.office.com/.default"

Clear-MsalTokenCache

$authresult = Get-MsalToken -Scope $Scope -ClientId $clientId -TenantId $tenantId -ClientSecret $ClientSecret

$accessToken = $authresult.AccessToken

write-host $accessToken

Get-JWTDetails -token $accessToken

$Text = "user=" + $targetmailbox + "$([char]0x01)auth=Bearer " + $accessToken + "$([char]0x01)$([char]0x01)"

write-host $Text

$Bytes = [System.Text.Encoding]::ASCII.GetBytes($Text)

$EncodedText = [Convert]::ToBase64String($Bytes)

write-host
write-host $EncodedText
write-host
write-host "IMAP XOAUTH2" -ForegroundColor Green
write-host "C02 AUTHENTICATE XOAUTH2 $EncodedText"
Write-Host
write-host "SMTP XOAUTH2" -ForegroundColor Green
write-host "AUTH XOAUTH2 $EncodedText"
When you run the script you’re using the Client Secret, you created earlier to authenticate, and get an OAUTH token, the script outputs the AUTH requests as two separate outputs, which slightly different commands at the front to use in each of the tests IMAP and SMTP respectively. You’ll see these highlighted with green titles.
.\get-token.ps1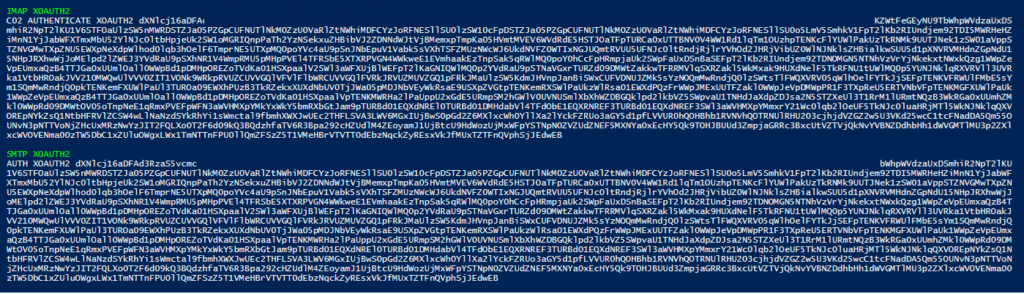
Testing IMAP
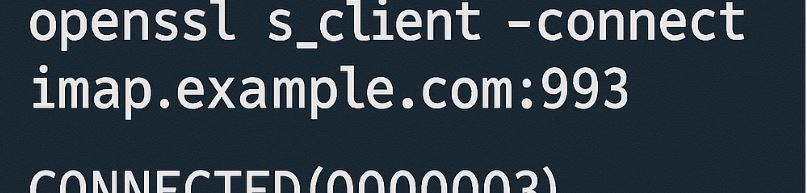
You can now use OpenSSL to perform the tests, note that on Microsoft Windows, we had problems with getting OpenSSL to work correctly with the commands, we were constantly seeing “BAD Command Error 12” when using the Microsoft Windows OpenSSL ports, but it worked fine on Ubuntu Linux.
So, firstly connect with:
openssl s_client -connect outlook.office365.com:993 -crlf -quietIssue the first command:
C01 CAPABILITYNow enter the second command which includes the OAUTH authentication string, the key is omitted in the below for security/brevity.
C02 AUTHENTICATE XOAUTH2 <Big long key you copied out of the PowerShell script here>Ensure you are pasting in the above command on a single line, not multiple lines.
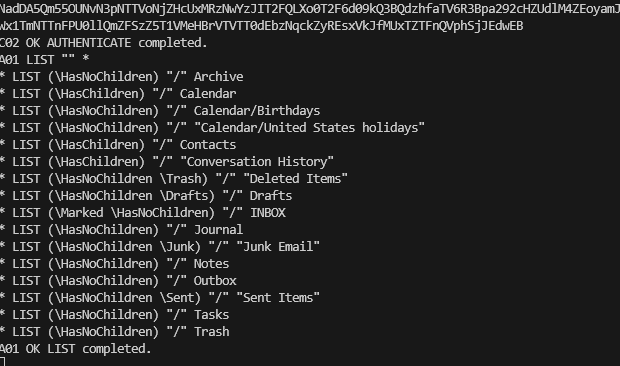
All being well you should see an output of:

If you now issue a list command:
A01 LIST "" *We should see the mailbox folder structure, and if we can the test has been successful!
Testing SMTP
Testing SMTP is similar to testing IMAP but the connection command is different.
openssl s_client -starttls smtp -connect outlook.office365.com:587 -crlf -quiet

EHLO blah.org.uk

AUTH XOAUTH2  <Big long key you copied out of the PowerShell script here>
All being well you should then see, 235 2.7.0 Authentication Successful.

Now let’s send an email:
mail from:zh1@blah.org.uk
rcpt to:ts01@blah.org.uk
data
From:zh1@blah.org.uk
To:ts01@blah.org.uk
Subject:Hello There! from SMTP CLI
Hi, this is a test from the SMTP CLI, typing the commands in one by one. Not tried Thunderbird yet, but that works differently anyway.
.
quit
Use lower case: rcpt to, rather than upper case RCPT TO.
All being well you should have received the email in the destination mailbox, if so, the test has been successful!
Conclusion
So we have been to verify and test the use of an Enterprise Application to send email as a user via IMAP and SMTP.
Additional Information
- https://blog.icewolf.ch/archive/2022/12/17/exchange-online-pop-and-imap-oauth-2-0-client-credentials/
- https://blog.icewolf.ch/archive/2022/12/20/exchange-online-other-ways-of-testing-imap-oauth2-client-credential/
- https://blog.icewolf.ch/archive/2023/07/24/Exchange-Online-IMAP-and-SMTP-OAuth-2-0-with-Delegated-Permissions/
Testing pop3
openssl.exe s_client -connect outlook.office365.com:995 -quiet
AUTH XOAUTH2
+
+OK User successfully authenticated.
list
+OK 2 791793
1 339277
2 452516
.
quit
Used OpenSSL client from here:
https://slproweb.com/products/Win32OpenSSL.html
Thanks, your blog was really helpfull