
During the preparation for a migration of the email service to Microsoft 365 Exchange Online, we were preparing a small test environment so we could step through what is required to faciltiate the links between Microsoft Active Directory, Microsoft Exchange on-premise and the Microsoft 365 cloud environment that includes Microsoft Exchange Online cloud hosted email.
Basic Exchange Configuration
We deployed a small test Forest, Domain with an Active Directory Domain Controller and a single Microsoft Exchange 2016 Server fronted by a Kemp Load Master to provide a single point of entry for all client connectivity.
The following configuration was made to the Microsoft Exchange 2016 Server to enable the InternalURL and ExternalURL to be the same (i.e. pointing at the Kemp Load Master) for each of the Client Access Services.
These tasks below need to be performed for each Microsoft Exchange 2016 Server in turn, and this is the crucial point, even if they are not directly facing the end users, i.e. even if the server is not put into a Load Balancers “real server” or back-end server pool to receive client connections. Microsoft Exchange proxies connections in the background, if you assume an Exchange Server won’t get connections and therefore don’t configure it as the below you’ll have problems.
In our example we’re using email.domain.com.
OWA (Outlook Web Access)
- Login to Exchange Control Panel as an administrator.
- Click on Servers.
- Click on Virtual Directories tab.
- Click on owa (Default web site), then click Edit (pencil).
- Under General, set the Internal URL to: https://email.domain.com/owa
- Under General, set the External URL to: https://email.domain.com/owa
- Click Save.
ECP (Exchange Control Panel)
- Login to Exchange Control Panel as an administrator.
- Click on Servers.
- Click on Virtual Directories tab.
- Click on ecp (Default web site), then click Edit (pencil).
- Under General, set the Internal URL to: https://email.domain.com/ecp
- Under General, set the External URL to: https://email.domain.com/ecp
- Click Save.
ActiveSync
- Login to Exchange Control Panel as an administrator.
- Click on Servers.
- Click on Virtual Directories tab.
- Click on Microsoft-Server-ActiveSync (Default web site), then click Edit (pencil).
- Under General, set the Internal URL to: https://email.domain.com/Microsoft-Server-ActiveSync
- Under General, set the External URL to: https://email.domain.com/Microsoft-Server-ActiveSync
- Click Save.
OAB (Offline Address Book)
- Login to Exchange Control Panel as an administrator.
- Click on Servers.
- Click on Virtual Directories tab.
- Click on OAB (Default web site), then click Edit (pencil).
- Under General, set the Internal URL to: https://email.domain.com/OAB
- Under General, set the External URL to: https://email.domain.com/OAB
- Click Save.
EWS (Exchange Web Services)
- Login to Exchange Control Panel as an administrator.
- Click on Servers.
- Click on Virtual Directories tab.
- Click on EWS (Default web site), then click Edit (pencil).
- Under General, set the Internal URL to: https://email.domain.com/EWS/Exchange.asmx
- Under General, set the External URL to: https://email.domain.com/EWS/Exchange.asmx
- Click Save.
Outlook Anywhere (previously known as RPC over HTTPS)
- Login to Exchange Control Panel as an administrator.
- Click on Servers.
- Click on Servers tab.
- Click on the server you wish to configure, e.g. SERVER1, then click Edit (pencil).
- Click on Outlook Anywhere on the left hand side.
- Set Internal URL to: email.domain.com
- Set External URL to: email.domain.com
- Set Authentication Method for external clients to: Negotiate
- Allow SSL Offloading must be Ticked.
- Click Save.
MAPI over HTTP (replacement for Outlook Anywhere)
The MAPI over HTTP configuration must be made via the Exchange Management Shell (EMS), so open the Microsoft Exchange Management Shell, then run the following commands.
Verify MAPI is enabled at the organisational level.
Get-OrganizationConfig | fl *mapi*Set the Internal URL and External URL for the MAPI over HTTP service with:
[PS] C:\> Set-MapiVirtualDirectory -Identity "SERVER1\mapi (Default Web Site)" -InternalUrl https://email.domain.com/mapi -ExternalUrl https://email.domain.com/mapi -IISAuthenticationMethods NegotiateThen to verify it is set run:
[PS] C:\>Get-MapiVirtualDirectory -Identity "SERVER1\mapi (Default Web Site)" | fl server, internalurl, externalurlBoth must be showing the same value, i.e. an FQDN which is an FQDN reachable from the Internet.
Autodiscover
Autodiscover also must be made via the Exchange Management Shell (EMS), so open the Microsoft Exchange Management Shell, as follows:
[PS] C:\Windows\system32>Set-ClientAccessService -Identity SERVER1 -AutoDiscoverServiceInternalUri https://autodiscover.domain.com/Autodiscover/Autodiscover.xmlThen verify it is set as expected with:
[PS] C:\Windows\system32>Get-ClientAccessService | fl AutoDiscoverServiceInternalUriYou’ll notice there is no external URL for autodiscover, for external clients you don’t have to configure autodiscover URL as they will try different autodiscover URLs based on combination of user’s email address. You should have a DNS record called autodiscover.domain.com which is a CNAME of: email.domain.com which points at your Load Balancer. A connecting client will try to find autodiscover.domain.com based on the domain of the email address entered e.g. bob@domain.com.
Restart Exchange (IIS)
Once configured you must restart Microsoft Exchange (i.e. all of them in the Exchange Organisation), we’ve found this was the best way to ensure that IIS was fully restarted and that the settings were taken as expected, in our case we observed the following issue on connecting clients, and the cause and resolution is given below; spoiler it was that one of the Exchange Servers had not fully taken the settings, more details below.
Observed Issue
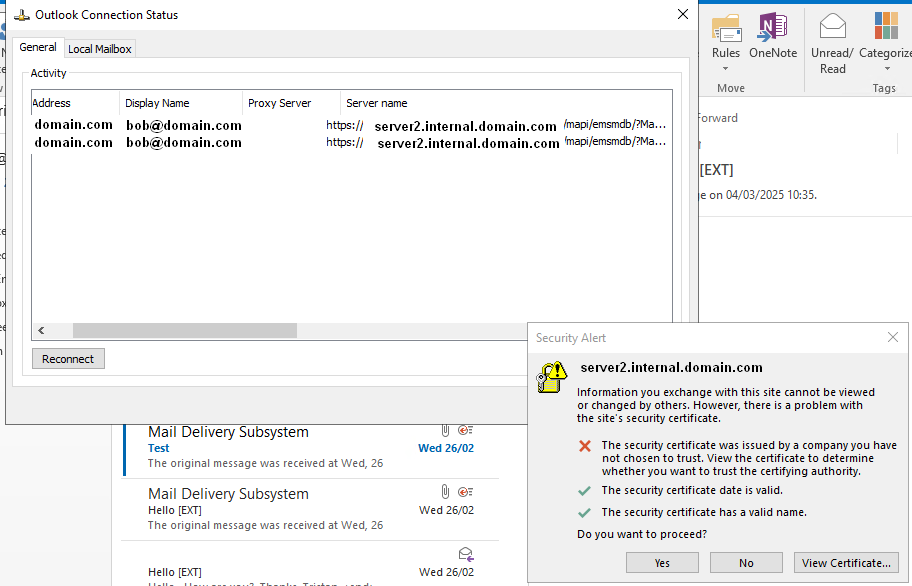
The observed issue was that once a second Microsoft Exchange Server was added that clients began to intermittently see the following error message:
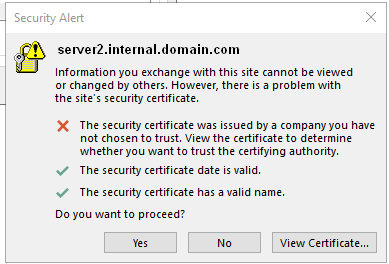
As you can see the warning is showing that the second Exchange Server “server2” is being connected to for some reason when the Outlook client is started, and what’s also apparent the Client is trying to connect to an internal URL, now in this case it could access it because it was on the same network (i.e. not External), but this was causing a problem.
Leaving it on screen and checking the Outlook Connection Status exposed it was trying to connect to the internal server name server2.internal.domain.com rather than the expected FQDN email.domain.com.
Using the Test E-mail AutoConfiguration the following was observed:
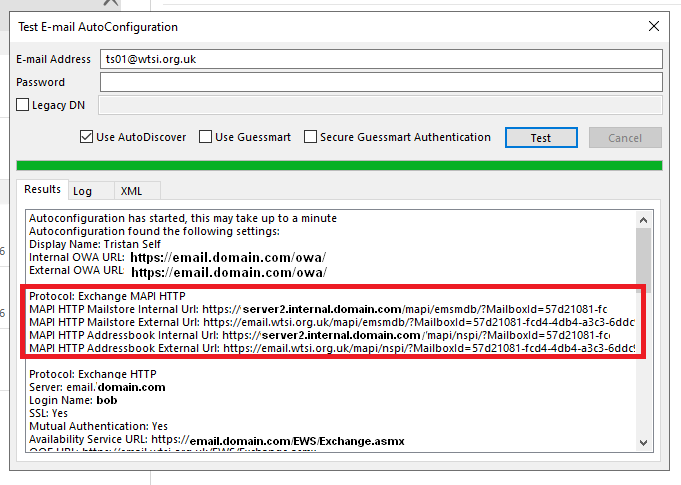
You’ll notice that autodiscover is providing an Internal URL that the client should not be using, hence why they are getting the certificate warning.
Resolution
The resolution was simple in the end, firstly ensure that you’ve applied the settings for all the Microsoft Exchange client access services listed above, and verify the settings have been made successfully including the MAPI over HTTP Internal and External URLs.
Then ensure you at a minimum restart IIS across all Exchange Servers, but ideally restart each Microsoft Exchange Server, to ensure that no server is providing the incorrect value to the client.
It is also worth mentioning the SCP, which is the Service Connection Point. This (for internal clients) is what the client uses first to find its autodiscover information, using ADSIEdit you can verify what the value for serviceBindingInformation from a path something like the following (yours will have different names as per your organisation’s settings. You need to verify this setting for each Exchange Server in your Exchange Organisation.
CN=SERVER2,CN=Autodiscover,CN=Protocols,CN=SERVER2,CN=Servers,CN=Exchange Administrative Group (FYDIBOHF23SPDLT),CN=Administrative Groups,CN=domain,CN=Microsoft Exchange,CN=Services,CN=Configuration,DC=internal,DC=domain,DC=com