We purchased some new servers for a new cluster and wanted to move from ESX 4.1 to ESX 5.5.
This means going from ESX to ESXi which removes the service console and some settings need to be different.
This will show you how to configure the first four NICs of the server into a 4 port etherchannel to a cisco switch with VLAN tagging enabled.
You’ll first need to setup the management network with an IP address on a single NIC, then reconfigure the portgroup and vswitch to work with etherchannel. Then finally configure the switch to etherchannel all the NICs together.
SOLUTION:
VMware ESXi Console Configuration Part 1
1. Firstly configure the management interface of the ESXi Host from the VMware Console, include the first NIC (vmnic0) and set the VLAN to it, in our case this is VLAN 202 for management and configure the correct IP address on it.
Configure Management Network -> Network Adapters -> Select vmnic0 (NIC 1)
Configure Management Network -> VLAN -> Enter VLAN 202 (i.e. the VLAN you are using for management)
Configure Management Network -> IP Configuration -> Enter the IP Address, Subnet Mask and Default Gateway.
Configure Management Network -> IPv6 Configuration -> Enter the IP Address, Subnet ID and Default Gateway. (or alternatively disable IPv6 if you do not use it….yet)
Configure Management Network -> DNS Configuration -> Enter the Primary, Secondary DNS and the hostname
Configure Management Network -> Custom DNS Suffixes -> Enter the suffix.
On your switch configure the port as follows:
interface GigabitEthernet1/1
 description *** OAKSMFESX01 - NIC 1 (Management 1) ***
 switchport
 switchport trunk encapsulation dot1q
 switchport mode trunk
!
2. Once this has been configured verify that you can ping things by using the “Test Management Network” option, you should also ensure you can attach the VMware ESXi Host to VCenter too at this point.
3. Now reboot the ESX host and ensure that when it comes back up you can still ping it and that VCenter can still communicate with it.
VMware GUI Configuration
1. Click on the ESX Host and then select the “Configuration” tab and then “Networking.”
2. For vSwitch0 you should see the “Management Network” Listed, you need to configure this so click on “Properties” of the vSwitch.
3. Click on the “Management Network” Port Group and then click on “Edit..” Then click on “NIC Teaming”
Now here is where the issue is, you’ll notice the tick boxes against the “Policy Exceptions”, basically if you change the vSwitch load balancing policy this port group doesn’t get updated, so when you reboot the server you’ll lose management access, so…..
4. Under the “Policy Exceptions” section, untick the “Load Balancing” option tick box, you’ll see the dropdown is greyed out. Click OK.
5. Now click on the vSwitch, click on “Edit..” Then click on “NIC Teaming” and under the “Policy Exceptions” section set the “Load Balancing” to “Route Based on IP Hash”. Then click on OK.
That’s it for here now, its all ready, what happens is the vSwitch policy will now override the local Management Network policy, so it changes this from Port ID to IP Hash for the load balancing setting. When we add all the ports to the vSwitch in the next few steps we’ll be in business because it will apply the correct setting to the “management network” and connectivity will be maintained as the management network will be load balanced across the etherchannel on VLAN 202, you can then add all the other portgroups for the other VLANs you want.
Cisco Switch Configuration
1. Here you need to configure all the 4 switch ports we are using the in the etherchannel and put them all into the port-group. Once we’ve done this we just then need to add the ports to etherchannel and set it up to trunk to it.
interface GigabitEthernet1/1
 description *** OAKSMFESX01 - NIC 1 ***
 switchport
 switchport trunk encapsulation dot1q
 switchport mode trunk
 channel-group 11 mode on
!
interface GigabitEthernet1/2
 description *** OAKSMFESX01 - NIC 2 ***
 switchport
 switchport trunk encapsulation dot1q
 switchport mode trunk
 channel-group 11 mode on
!
interface GigabitEthernet2/1
 description *** OAKSMFESX01 - NIC 3 ***
 switchport
 switchport trunk encapsulation dot1q
 switchport mode trunk
 channel-group 11 mode on
!
interface GigabitEthernet1/1
 description *** OAKSMFESX01 - NIC 4 ***
 switchport
 switchport trunk encapsulation dot1q
 switchport mode trunk
 channel-group 11 mode on
!
interface Port-channel11
 description *** Etherchannel to OAKSMFESX01 NIC 1,2,3 & 4 ***
 switchport
 switchport trunk encapsulation dot1q
 switchport mode trunk
!
VMware ESXi Console Configuration Part 2
1. Now go back to the Console, perform the following steps:
Configure Management Network -> Network Adapters -> Select vmnic1 (NIC 2), vmnic2 (NIC 3) and vmnic4 (NIC 4)
When prompted restart the management network.
2. Now you should test you still have connectivity to the ESX host management interface, all being well you should, you should also ensure the port-channel is up on the switch with:
#show etherchannel 11 summary
Flags:  D - down        P - bundled in port-channel
        I - stand-alone s - suspended
        H - Hot-standby (LACP only)
        R - Layer3      S - Layer2
        U - in use      N - not in use, no aggregation
        f - failed to allocate aggregator
        M - not in use, no aggregation due to minimum links not met
        m - not in use, port not aggregated due to minimum links not met
        u - unsuitable for bundling
        d - default port
        w - waiting to be aggregated
Number of channel-groups in use: 18
Number of aggregators:           18
Group  Port-channel  Protocol    Ports
------+-------------+-----------+-----------------------------------------------
11     Po11(SU)         -        Gi1/1(P)       Gi1/2(P)       Gi2/1(P)
                                 Gi2/2(P)
Last applied Hash Distribution Algorithm: Fixed
From this it all looks good, so now we have a switch configured with a trunked etherchannel to the first 4 NICs of the ESX host. And the ESX Host vSwitch configured to etherchannel out to the network too. So we have a 4GBit etherchannel to the vswitch, where there is an active port group for the Management Network that will respond on VLAN 202. Plus we can now add the other VLANs for network traffic etc in here too and get the benefits of 4Gbit Ethernet connectivity plus load balancing and redundant management network connections.
3. Finally reboot the ESX host and verify that Management network access remains after the reboot. I..e you can access it via Vcenter plus from the VMware console you can ping the default gateway and DNS servers successfully.
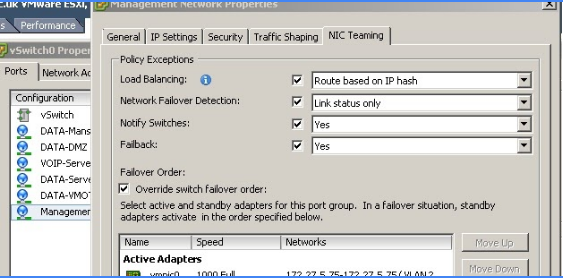
So here is the Load balancing setting after the reboot, you’ll notice that the box is ticked again, which means it is overriding the setting on the vswitch, but this is okay because its set to IP Hash, if we hadn’t unticked this setting earlier, it would have stayed at port ID setting. Then when we enabled the etherchannel and the IP Hash setting on the vswitch, we’d of lost the Management Network connectivity. Grrr.
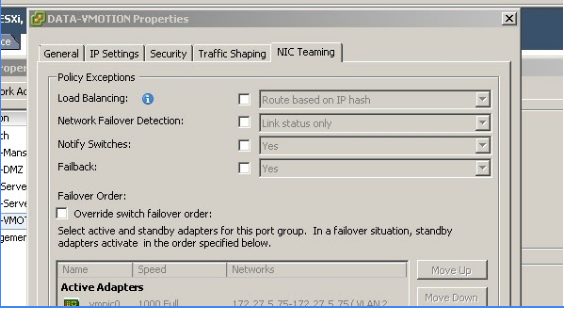
So that seems to be it, once you’ve configured it and rebooted, the tick goes back to separate the management network port group from any other port group setting or the vSwitch settings, probably safe but in this case can catch you out. For example see the port group settings for our VMOTION port group, here you see all the boxes are unticked, meaning it inherits from the vswitch settings, which is good, because that means it will work, any others you add will be the same too.