VMware have recommended that upgrading from Distributed vSwitch version: 6.0.0 to 6.5.0 or 6.6.0 should be done as a side by side migration rather than an in place upgrade due to the risk of outage when performing the upgrade in place, this is detailed in the following VMware article: https://docs.vmware.com/en/VMware-vSphere/7.0/com.vmware.vsphere.networking.doc/GUID-330A0689-574A-4589-9462-14CA03F3F2F4.html. It is understood that vDS version 7.0.0+ does not experience these same issues, so an in-place upgrade can be made without impact to services.
- https://williamlam.com/2018/09/vmotion-across-different-vds-version-between-onprem-and-vmc.html
- https://kb.vmware.com/s/article/2126851
vMotion Across Different vDS Version
To allow the migration of VMs from the old Distributed Switch to the new Distributed Switch requires some steps to be taken to reconfigure vCenter.
- Click on the vCenter.
- Click on Configure → Advanced Settings → Edit Settings
Add the property (below) and set the value to true and click OK to save.
config.migrate.test.NetworksCompatibleOption.AllowMismatchedDVSwitchConfighttps://kb.vmware.com/s/article/79446
Side-By-Side Migration/Upgrade Procedure Overview
Essentially the side-by-side migration/upgrade procedure requires the following steps to be completed high level and the below steps need to be performed for each Distributed vSwitch that is operating on the legacy version to ensure a new counterpart is put in its place if the host has more than one Distributed vSwitch in use.
Preparation
- The creation of a new Distributed vSwitch at the correct version (i.e. 6.6.0).
- Duplicate Port Group configuration from the legacy Distributed vSwitch, include all relevant configurations, ensure the Port Uplink configuration is also Active (Uplink 1), Backup (Uplink 2).
Per-Host
- Put the host into maintenance mode.
- Attach the new Distributed vSwitch to the ESXi Host.
- Remove one pNIC (uplink 2) from the legacy Distributed Switch for that ESXi Host, and re-attach to the New Distributed vSwitch as uplink 2.
- At this point you are running at risk, single uplink only is available to each Distributed vSwitch.
- Move the Management Networks vmKernel Port from the Management Networks Legacy Port Group on the Legacy Distributed Switch for that ESXi Host to the Management Networks New Port Group on the New Distributed Switch for that ESXi Host.
- Move the vmotion Networks vmKernel Port from the vmotion Networks Legacy Port Group on the Legacy Distributed Switch for that ESXi Host to the Management Networks New Port Group on the New Distributed Switch for that ESXi Host.
- Verify management connectivity is maintained.
The host is now ready to have the VMs moved onto it, and then each of these VMs having their Port Group updated from the Legacy Port Group on the Legacy Distibuted Switch to the new Port Group on the New Distributed Switch.
Move VMs
- Migrate a number of VMs to the ESXi host (which its half-legged network configuration).
- For each Legacy Port Group, select “Migrate VM Networking” and move only the VMs on that ESXi Host to its New Port Group counterpart on the new Distributed vSwitch.
- Repeat this until all VMs on the half-legged ESXi host are using their corresponding New Port Group on the New Distributed vSwitch.
Clean-Up
- Remove pNIC (uplink 1) from the legacy Distributed vSwitch for the ESXi host (with its half-legged network configuration). You then have the legacy Distributed vSwitch on that ESXi host with no uplinks, and both uplinks attached to the New Distributed vSwitch.
- Remove the Legacy Distributed vSwitch from that ESXi host.
You’ve now completed the process for one ESXi host for one Distributed vSwitch.
Test
- Verify connectivity is sound.
- Make sure the failure of an uplink is tolerated, in both failure states, i.e. Uplink 1 or Uplink 2 in turn.
Host Migration Procedure
Put host you wish to migrate into maintenance mode before you conduct these steps, its just best to do this to ensure that no VMs are moved onto this while you are performing potentially dangerous steps, it also helps you identify the host you are working on because it will be the only one in Maintenance Mode.
In this example my legacy distributed switch is called “dvProductionNetworks”, i.e. this is the distributed switch we’ll be migrating from, there is then the new distributed switch called “dvsProductionNetworks” and this is the switch we’ll be migrating to.
Legacy Distributed Switch – dvProductionNetworks – Migrate Uplink 2
On the host in question.
1. Configure→ Virtual Switches → Distributed Switch: dvProductionNetworks, click on “Manage Physical Adapters”.
2. Click “X” on the dvUplink2, physical NIC.
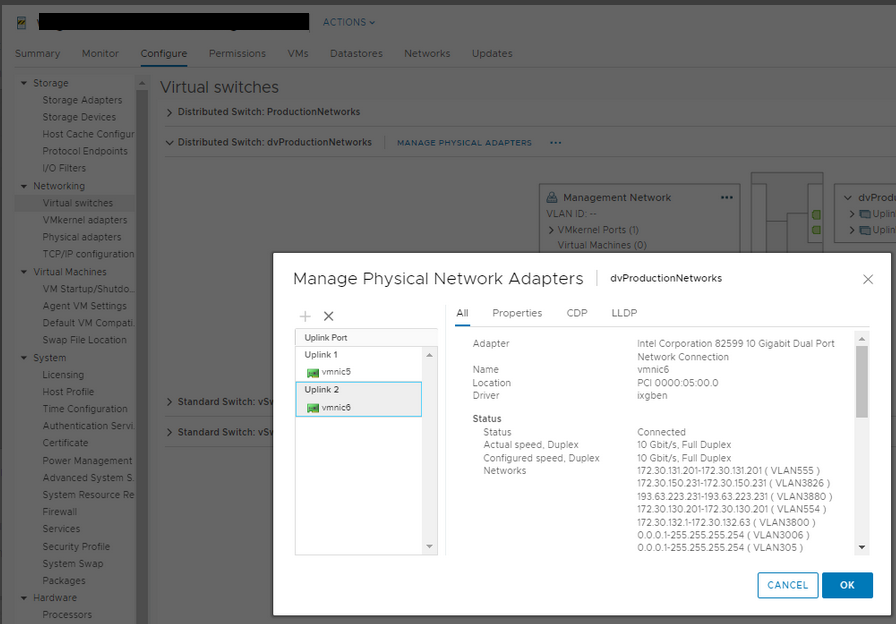
You now have one uplink missing from the Distributed Virtual Switch and one uplink now un-attached.
3. Attach the New Distributed Switch 1: dvsProductionNetworks to the host.
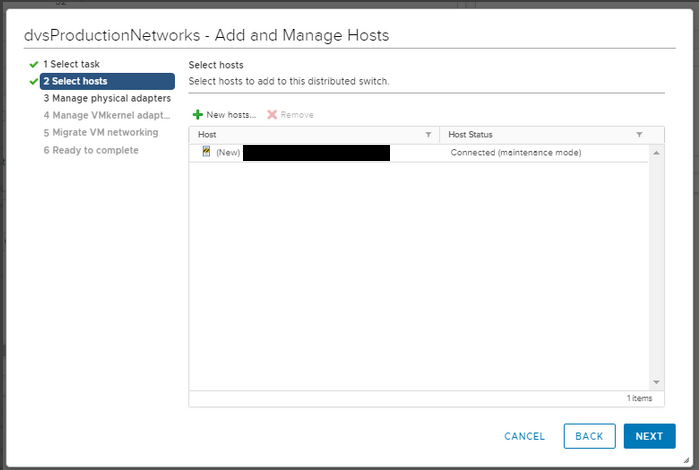
4. Click on “Netwoks” then right click on dvsProductionNetworks, click “Add and Manage Hosts…”
Task 1 – Click “Add Hosts

Task 2 – Click select host in question, so pick your desired hostname.
Task 3 – Select the physical NIC you just removed (vmnic6), then click on “Assign Uplink”. And then attach it to “Uplink 2” of this new Distributed Switch.

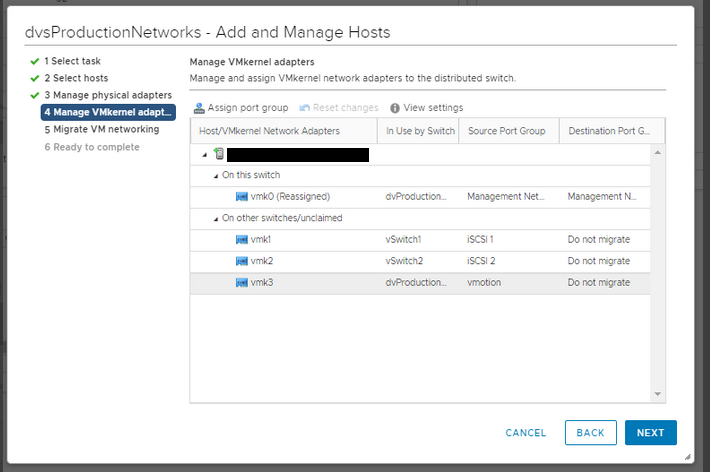
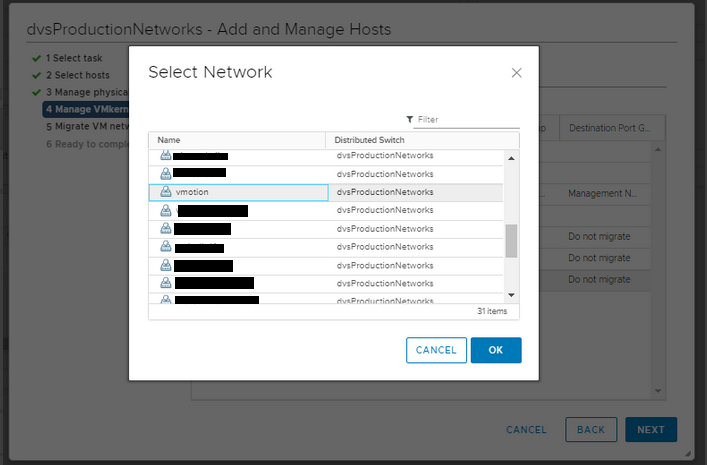
Task 4 – Migrate vmKernel Adapters, select vmk0 then click “Assign Port Group” and then select the “Management Networks” Port Group from the new Distributed Switch: dvsProductionNetworks.
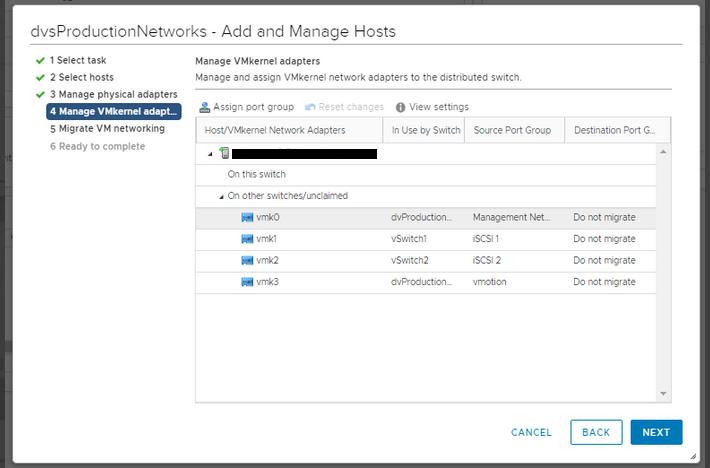

Select vmk3 then click “Assign Port Group” and then select “vmotion” Port Group from the new Distributed Switch: dvsProductionNetworks.
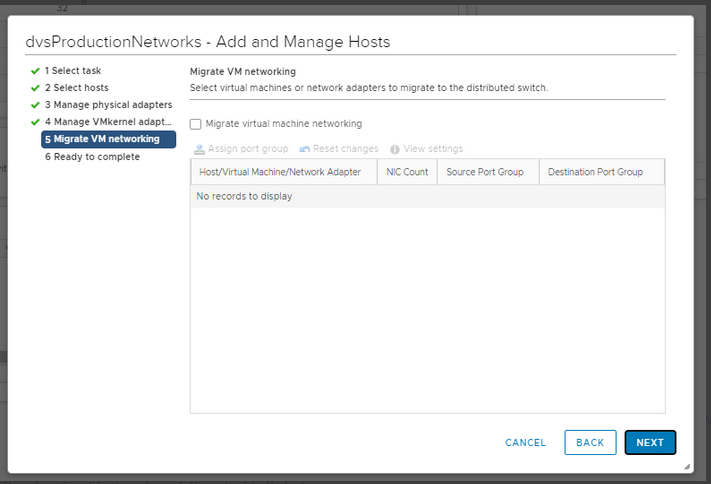
Task 5 – Migrate VM Networking, we don’t at the moment need to do anything with this step.
Task 6 – Ready to complete, click “Finish”.
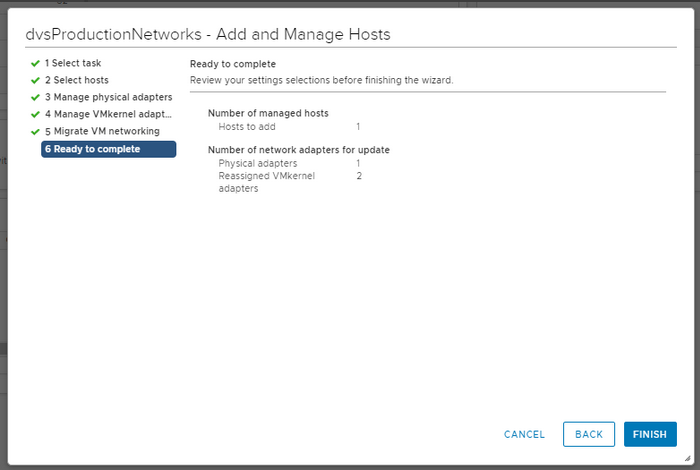
All being well and after a short blip in the network connectivity, your uplink should be moved to the new Distributed Switch along with the vmk0 (Management) and vmk3 (vmotion) vmKernel ports, you can now migrate Uplink 1 to complete the move.
Legacy Distributed Switch – dvProductionNetworks – Migrate Uplink 1
On the host in question.
1. Configure→ Virtual Switches → Distributed Switch: dvProductionNetworks, click on “Manage Physical Adapters”.
You’ll notice that this Distributed vSwitch only has a single pNIC connected.
2. Click “X” on the dvUplink1, physical NIC. Click OK.

You’ll get a warning about there being no active uplinks into this Distributed Switch, that is expected, we’re moving them both off to the new switch so we can remove this legacy Distributed vSwitch. Click “OK” to confirm.
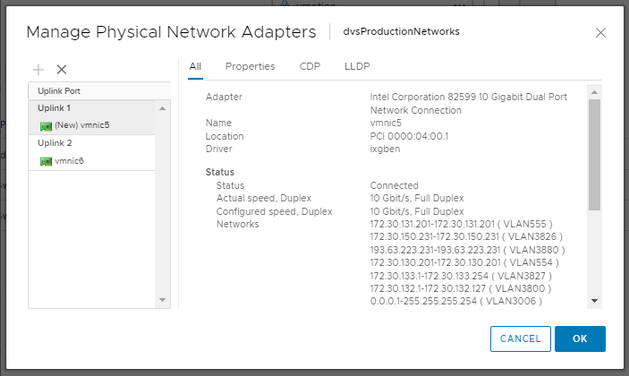
3. Now click on the “Manage Physical Adapters” on the new Distributed vSwitch: dvsProductionNetworks.

4. Click on the “+” while on “Uplink 1” and pick the pNIC you just removed from the legacy Distributed vSwitch in the previous step. “vmnic5” in this particular example, then click “OK”.

5. Now click on “OK” to complete the change.
You may see a small network blip again, but all being well you now have finished the migration of the uplinks to this new Distributed Switch.
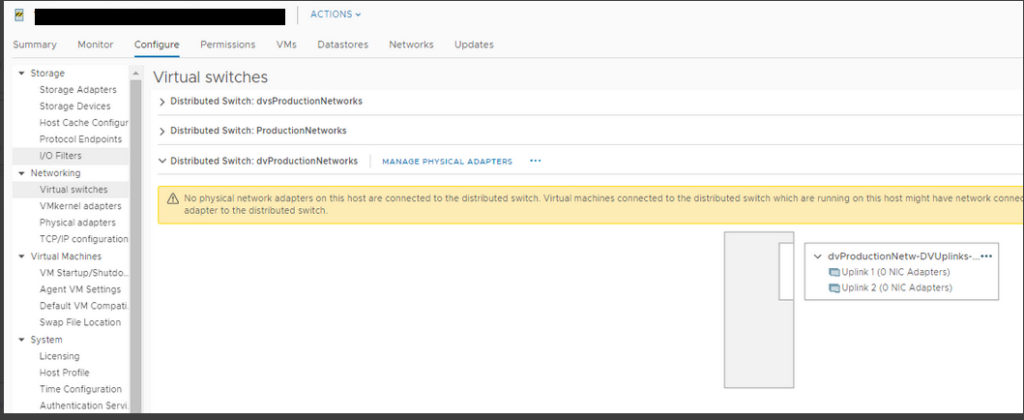
Legacy Distributed Switch – dvProductionNetworks – Remove Legacy Distributed vSwitch from Host
The legacy Distributed vSwitch: dvProductionNetworks should now be showing that it is missing any uplinks, this is what we want to see, we are ready to remove it.
On the host in question.
1. Configure→ Virtual Switches → Distributed Switch: dvProductionNetworks, click on the three dots (ellipsis) and click “Remove” to remove the legacy Distributed Switch: dvProductionNetworks from the host.
Confirm with “Yes” and you’ve now sucessfully migrate from the Legacy Distributed Switch: dvProductionNetworks to the New Distributed Switch: dvsProductionNetworks for this particular host.
You may also see a Alert on the host about “Network Uplink Redundancy Lost”, this is expected, just ensure each link is up and “Reset to Green” on the alert. We’ll perform a quick test in the next step.
Test New Distributed vSwitch Uplinks for Migrated Host
We’re going to test removing each uplink in turn from the new Distributed vSwitch attached to this host.
It is recommended to ensure you have at least one (unimportant) VM attached to a Port Group on the Distributed Switch, so you have something that you can ping to and verify the loss of an uplink to a pNIC doesn’t cause any network outage. Essentially simulating physical switch a maintenance or failure.
On the host in question.
1. Configure → Virtual Switches
2. Ensure you can see the status of each pNIC by expanding the > against each as follows:
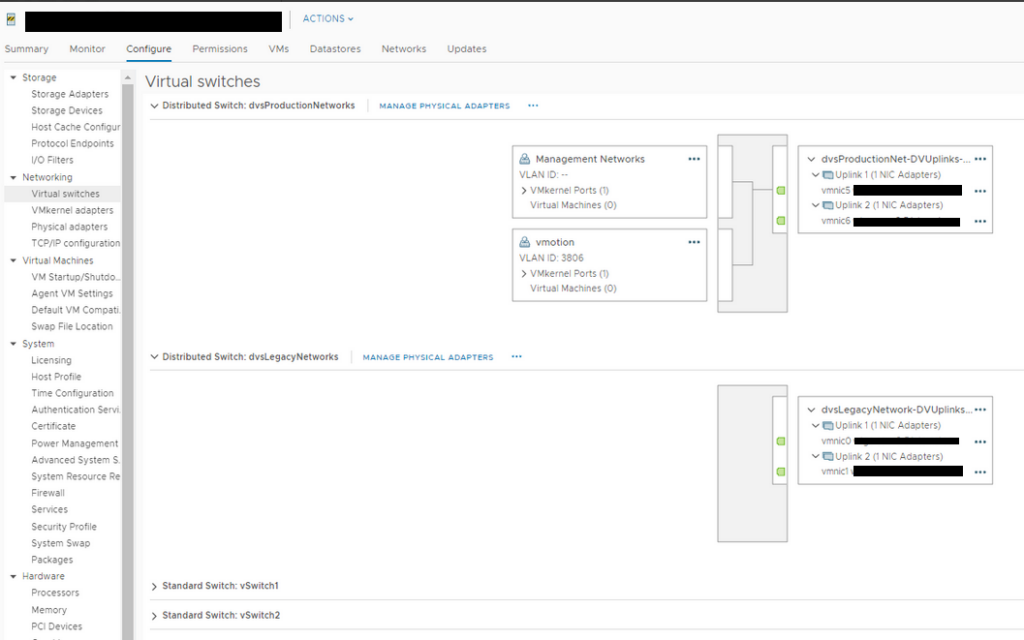
3. Perform the following steps for both of the Distributed vSwitches on the host to verify all four Uplinks.
- On the upstream physical network switch, disable the uplink to pNIC1 of the Distributed Switch.
- Verify traffic is utilising the surviving uplink to pNIC2 of the Distributed Switch.
- Renable the uplink to pNIC1 of the Distributed Switch.
- Ensure that any errors have cleared and there are no issues with connectivity to the host or VM(s).
- On the upstream physical network switch, disable the uplink to pNIC2 of the Distributed Switch.
- Verify traffic is utilising the surviving uplink to pNIC1 of the Distributed Switch.
- Renable the uplink to pNIC2 of the Distributed Switch.
- Ensure that any errors have cleared and there are no issues with connectivity to the host or VM(s).
That’s it, that host is now ready for the limelight, you can take it out of maintenance mode.
Bear in mind that when you are migrating VMs onto it they will be going onto a new Distributed vSwitch, ensure you have sufficient capacity to tolerate a failover of the hosts you have already swapped to the new Distributed Switches, this is because from an HA point of view, the VMs will only move to hosts with the “same” networking, in this case you are moving the network so they don’t appear as the “same” network to HA, even though underneath in the physical network they are, so bear this in mind.