The HPE Nimble Storage array can be managed via a Web Interface, SSH Console or API, you can Active Directory (or LDAP in later NimbleOS version) integrate the array for management access.
At the time of writing MFA or 2FA is not natively supported, however I believe it is on their roadmap to add SAML authentication which could make adding MFA/2FA much more straightforward and compatible than this approach.
So why should use MFA or 2FA, well, let’s consider a scenario, a hacker obtains some user credentials for one of your System Administrators, you’ve configured your two Nimble Storage arrays with AD integrated authentication, so a System Administrator can just log straight on with their credentials.
The hacker therefore can logon to the management interfaces of the Nimble Storage arrays and because there is no MFA, they only need these credentials to get in and manage the platform, which includes deleting all your data, with no way to recover, because they can delete the snapshots too!
Overview
Within this post I’ll explain how you can secure your Nimble Storage management interfaces using some simple techniques (applying a security policy) but more importantly how to enable MFA authentication via Okta. I’ll also explain how configure SSH keys for your users (for reasons which become clearer shortly).
Known Limitations
The configuration of the authentication approach is not ideal and has some limitations, however at the time of writing we understand that the development roadmap for the platform has a planned SAML integration which would allow this authentication to be done far more smoothly and completely than the methods described below. Therefore the following limitations should therefore be considered:
- The “Admin” account cannot be activated for Nimble Storage, therefore they should not be normally used.
- You can only create new accounts using the local admin account, this is because you need to enter the administrative account (you are using) credential – which if this is your administrative account you don’t know! Ergo you must use the Local Admin Account.
- You can only reset passwords using the local admin account for the reason listed above.
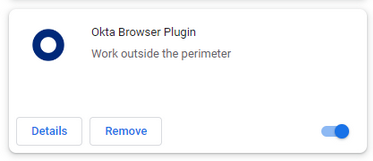
- Requires a browser plugin to operate, as the OKTA plugin is needed to push the credentials stored on OKTA through to the logon boxes on the Nimble Storage web interface.
- The same credentials may or may not be used across all the arrays for each user, however this increases the complexity of the configuration; however it does increase the security.
- SSH console access requires the use of SSH keys to be configured, because the Okta process does not work using this, again the Local Admin account must be used to configure the SSH keys.
- If a system administrator no longer requires access you must remove that user’s account manually for all the arrays, bear in mind however they would not know their credentials, therefore even if they did remain, they wouldn’t actually know them.
Observations
- System Administrators once logged on, cannot change their own password, this is because they don’t actually know their own password which is what is prompted for.
Simple Security Improvements
All user accounts (local) should be subject to a simple security policy, this ensures that accounts are locked automatically in the event of a hacking attempt. The below is just an example, but adjust to wherever you feel comfortable, remember when you implement the OKTA MFA authentication your system administrators won’t ever know or need their Nimble Storage array credentials, they will be authenticated via OKTA (which holds their credentials for them).
| Attribute | Value |
|---|---|
| Password Length | 8 |
| Uppercase Characters | 3 |
| Lowercase Characters | 3 |
| Numeric Characters | 1 |
| Special Characters | 1 |
| Characters Needed to Change | 1 |
| Password Reuse History | 5 |
| Attribute | Value |
|---|---|
| Maximum Failed Login Attempts | 5 |
| Concurrent Sessions (Management) | 10 |
Accounts that have over 5 logon attempts will lock and will need to be unlocked by another user, as this lock is permanent until manually unlocked by another administrator.
If the built-in “admin” account locks, it automatically unlocks itself after 15 minutes, this is an important point, without the local “admin” account as a fallback you can’t get into your array, its recommended to put in place some sort of monitoring via SYSLOG that can identify failed logon attempts for this account.
Active Directory (or LDAP) Integration
These instructions assume that your Nimble Storage array is not bound/joined to Active Directory, in this case you’re managing all access locally on the array, but joining it to your main authentication infrastructure via OKTA.
Install OKTA Helper Browser Plugin
The Nimble Storage 2FA configuration detailed below requires that the system administrator install a Google Chrome Plugin (other plugins are available) into the browser to enable the OKTA verification method.
- Open Google Chrome (or other browser)
- Visit the following link to download the plugin: https://help.okta.com/en-us/Content/Topics/Settings/download-browser-plugin.htm
- Install the plugin.
- Check it is installed under: Settings→Extensions.
Okta Authentication Web Management Configuration
These steps are only required once to setup an application for a particular Nimble Storage array; once an array’s application is created, all settings are then made on a per user basis.
1. Logon to the Okta Administrative Console.
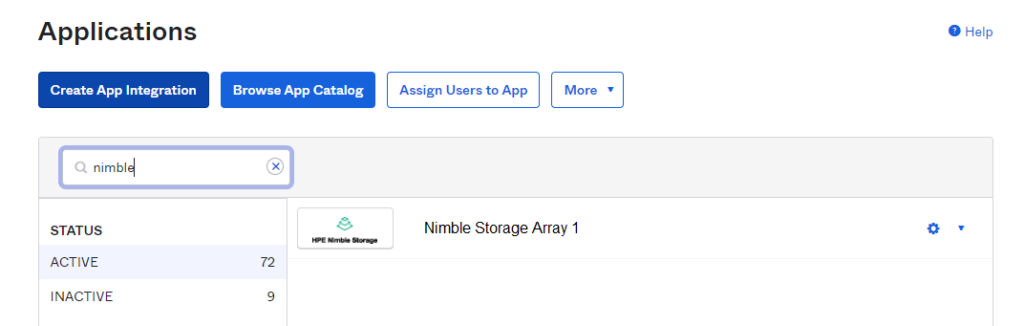
2. Click on “Applications”→”Applications”, to see the Applications 😀
3. Click “Create App Integration” and select “SWA – Secure Web Authentication”, then click “Next”.
4. Complete the first section as follows (adjusting as needed):
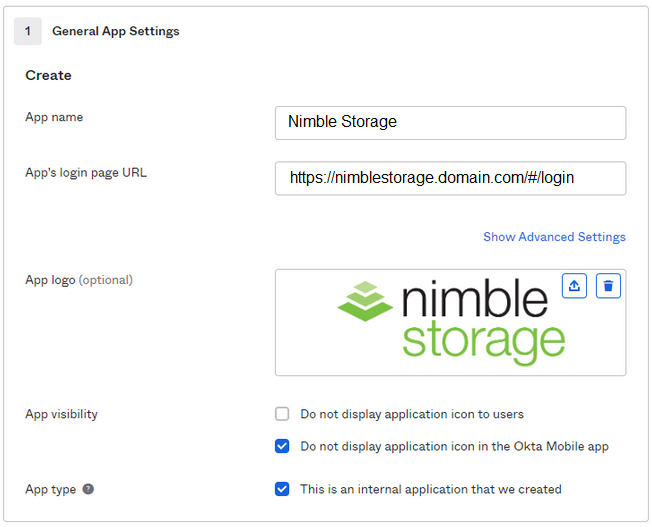
The URL is important, I’d recommend you go to the web interface and then just copy the URL that is shown on your browser, ensure you include the last bit i.e. the “/#/login”.
5. Then the next section, here we’re setting this option “Administrator sets Username and Password”, because we create a secret credential for each user of the system (see procedure above).
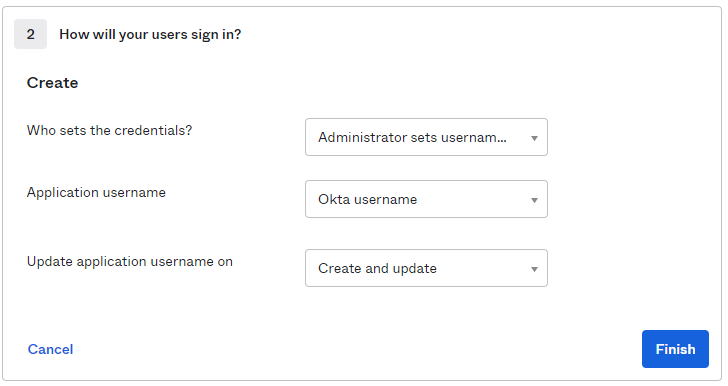
6. Then click “Finish”.
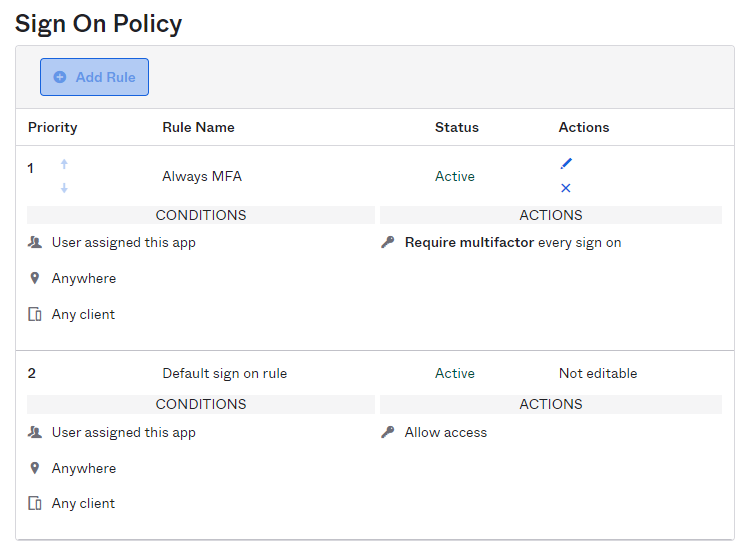
7. Click on “Sign On” tab for your new application, then see the “Sign on Policy” section, set the following configuration:
8. Click on “Assignments” to add the relevant System Administrators for each Application.
9. Then ensure their user credential is created for each Nimble Storage array see the procedure above.
Once they have the account created on the Nimble Storage array they are able to then use this application within OKTA.
On-boarding a New Nimble Storage Administrator
On-boarding a new Nimble Storage Administrator is fairly straightforward, however it cannot be performed under your own administrator account. This is a limitation of the approach used, until SAML is natively supported the issue you will run across is that resetting a user password requires you to enter the/your administrator password to reset that user’s account password, of course you don’t know this (which will become clearer in this section), so you must therefore use the local “Admin” account to perform on-boarding.
Step 1 – Create the Local HPE Nimble Storage Administrator Account
1. Logon as the “Admin” account to the HPE Nimble Storage Web Administration Console.
2. Click “Administration”→”Security”→”Users and Groups”.
3. Create the User Account with the user’s Full Name, email address and set as the correct role, e.g. Administrator or Guest etc.
All usernames should use the format: <username>, e.g. bobsmith account local Nimble Storage administrator account should be: bobsmith, makes it easier to ensure linking up the accounts and using SSH keys.
Ensure you add “OKTA Controlled” in the Description field to make it obvious this is an OKTA managed account.
4. Once created set the password to at least 20 characters and strong, you’ll need this for the Okta configuration in the next step, after which you can discard this password, neither you or the system administrator to whom it belongs needs to know what it is.
Now repeat these steps for all of the Nimble Storage arrays, you can use the same credentials for each administrator for each, this is required by Okta.
Alternately use the command line to create a user account:
useradmin --add bobsmith --description "Okta Controlled" --full_name "Bob Smith" --email_addr bsmith@domain.com --role administrator --inactivity_timeout 30Then set the password.
Step 2 – Configure Okta Application
The following steps will need to be performed in turn for each of the HPE Nimble Storage applications within Okta.
1. Logon to the Okta Administration Console – within the “Admin” section.
2. Click on the HPE Nimble Storage application for the array you wish to configure.
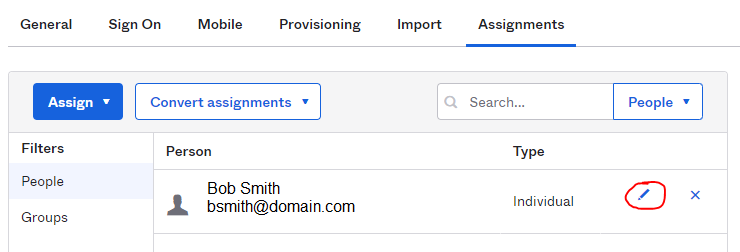
3. Click on the “Assignments” tab.
4. Click “Assign to People” and select the relevant System Administrator.
5. Once added click the Pencil icon against their name to configure their unique username and password you created in step 1.
6. Enter the credentials you created earlier and click “Save”.
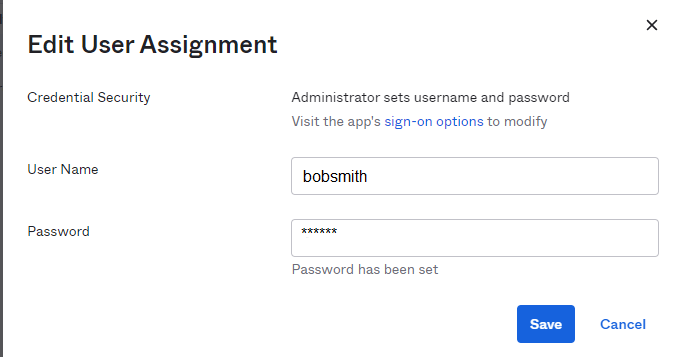
Remember these are the credentials of the user account you just made in the earlier step, not the user’s normal credentials. Additionally this can be a different set of credentials for each Nimble Storage array.
You’ve now setup this administrator, verify that they can click on the application within OKTA and are automatically logged into their Nimble Storage account on the array.
Step 3 – Create the HPE Nimble Storage SSH Key
You’ll need to repeat these steps for each of the Nimble Storage arrays in turn. You will need to obtain the system administrators SSH Public Key before you start this procedure. The procedure was discovered from: https://community.hpe.com/t5/Application-Integration/How-to-setup-Nimble-OS-to-use-SSH-Authentication-using-an-RSA/td-p/6982830#.Ys7rvHaKS9J
These instructions assume you have the user’s SSH public key and you have it exported in RSA format ready for use, the only tricky bit is getting it as a single line of text because you need to paste it in the command as below.
1. Logon as the “Admin” account to the HPE Nimble Storage SSH console.
2. Run the command as follows, you should call the key “bobsmithkey” this is a just a label. And also ensure you add the “–user bobsmith” to ensure you are installing this public key against that user’s account (you created in step 1).
Nimble OS $ sshkey --add bobsmithkey --type rsa --key <User's SSH public key in a big long key string all on one line, yes really> --user bobsmith3. Once installed, verify it is there with:
Nimble OS $ sshkey --list --user bobsmith
--------------------+------------------------------+---------
User                 Name                           Type
--------------------+------------------------------+---------
bobsmith           bobsmithkey                  rsa
4. That’s it, the user is now ready to logon!
Remember to repeat for each storage array this user needs to access.
ssh bobsmith@nimble1.domain.com -i bobsmith.pubConclusion
As you can see its fairly straight forward
1 thought on “Multi-Factor (MFA/2FA) Authentication for HPE Nimble Storage using Okta”