
Ansible Vault encrypts secret variables or entire YAML files inside the repository. To unlock (see) these at the point of running the Ansible Playbook you need the Vault Password to unlock them.
We’re going to create a simple example to illustate how it can be used.
Ensure you have added the SSH Key to your github so when you are trying to use your own repository you can access it from your machine. In my example below, i’m creating a new repository from scratch, then copying in my simple example Ansible playbook from another project, but in your case you may want to write one from scratch.
Scenario
We have a simple Ansible playbook that deploys a simple Web Server configuration to a Fedora (RedHat) virtual machine. To illustate how a Secret can be retrieved at Ansible Playbook runtime and then written into a file on the webserver (akin to a configuration file for example). So this illustates how this secret value can be stored within the GitHub repository safely, and unlocked and used at runtime only.
We’ll first need to get a repository setup which will contain our simple Ansible example.
Or you can clone my example here: https://github.com/tristanhself/ansible-vault if you want to get a simple setup ready quickly.
Prerequistes
There are some steps to complete first.
You need to have your Ansible Management Workstation prepared with a SSH Key pair created and ready for use to both access Github, but also to access our target Web Server which we’ll be managing with Ansible and applying the Secret from Ansible Vault to. I’ve not provided instructions for this, but essentially as long as you can logon as a user on the Web Server (which has sudo) without a password (SSH Key authentication), then you are all set.
Install Packages
Install some things.
sudo apt update
sudo apt install -y python3 python3-venv python3-pip openssh-client git
sudo apt install ripgrep
Load SSH Key into SSH Agent
We first need to load in the SSH Private key into your SSH Agent, obviously this will be other half of your SSH Public Key that you have loaded into your Git Repository trusted key store, (i.e. Profile → SSH and GPG Keys → Authentication Keys.)
eval $(ssh-agent -s)
ssh-add ~/.ssh/id_ed25519
ssh-add -l
Clone Repository
Next we’re cloning the repository, if however you are creating one from scratch, then do that instead.
git config --global user.name "My Name"

git config --global user.email "me@mydomain.com"

cd ~/projects
git clone git@github.com:tristanhself/ansible-vault.git
If you are copying in some sample Ansible Playbook files then do that now, otherwise in the cloned repository you’ll find the example Ansible Playbook.
Create a Python Virtual Environment (for Ansible)
We now create and source a Python Virtual Environment we can use for Ansible.
mkdir ~/virtualenvs
cd ~/virtualenvs
python3 -m venv ansible-venv
source ~/virtualenvs/ansible-venv/bin/activate
Install all the requirements we need from the project:
cd ~/projects/ansible-vault
pip install -r requirements.txt
Once installed, check Ansible is there with a version and we’re all set.
ansible --versionStep 1 – Run Ansible Playbook
We’ll run the Ansible Playbook to ensure everything is all up to date and working as expected.
ansible-playbook site.yml -u web01-admin -i hosts -l web01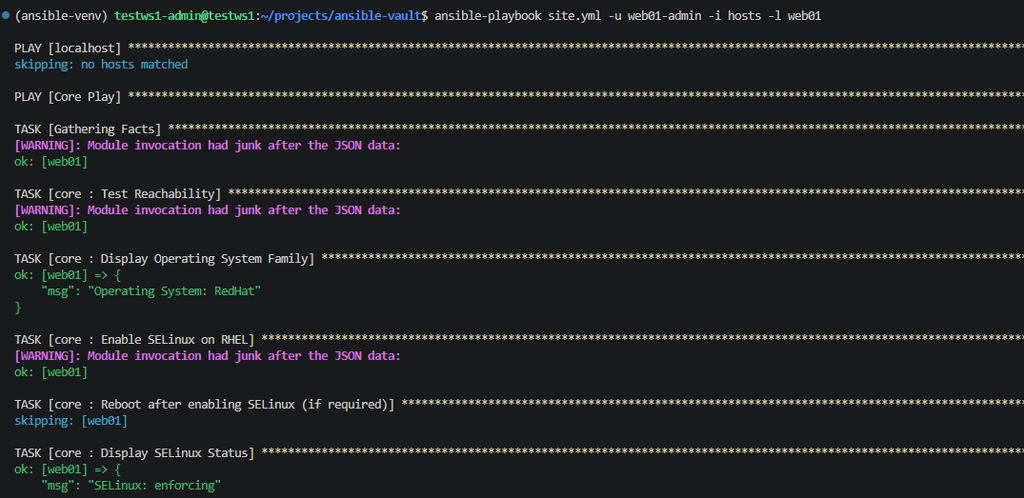
Assuming that you’ve cloned the repository, you’ll find that its expecting the Ansible Vault password, if however you have not done this and are instead adding it, as per step 3. Then just carry on for now.
Step 2 – Create Encrypted Variables File
Now we are happy our Ansible is working, we can then create an encrypted variables file within our repository.
cd ~/projects/ansible-vault/
ansible-vault create hosts/group_vars/all/vault.yml
Enter your Ansible Vault Password, this is the secret that is used to protect the Ansible Vault, you’ll need to provide this going forward to gain access to the Ansible Vault to extract the secrets when you run the Ansible Playbook.

We’ll just use “Password1234!” as this is an example. Obviously enter twice to confirm.
Enter the secrets within the editor when prompted, remember this is YAML, so you need to enter in this format:
vault_database_username: appuser
vault_database_password: SuperSecretPassword123!
Your Ansible Vault has now been created:

To verify it is there, you can run the following, which will show one or more of your Ansible Vault files present in the repository, in our case we only have one.
rg -n '\$ANSIBLE_VAULT|!vault' .
If you were to open it, you’d just see the encrypted text, which means its “safe” to be kept in your Git Repository because without the Ansible Vault password, you can’t see the secrets hidden within.
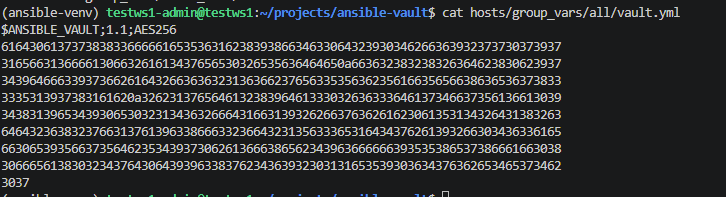
To get the output you can run:
ansible-vault view hosts/group_vars/all/vault.yml --ask-vault-pass
Step 3 – Create Application Template Referring to Ansible Vault and Ansible Task
We’re going to add a Jinja template file to the “webservers” role which will be our example pretend application configuration file.
~\ansible-vault\roles\webservers\templates\application.cfg.j2
# Example Configuration File
username: {{ vault_database_username | to_json }}
password: {{ vault_database_password | to_json }}
Now we need to add to the task to the role, so within the main.yml for the tasks we need to add the following section:
~/ansible-vault/roles/webservers/tasks/main.yml
...
- name: Create application configuration directory
	ansible.builtin.file:
		path: /etc/myapp
		state: directory
		owner: root
		group: root
		mode: "0750"

- name: Install application configuration
	ansible.builtin.template:
		src: application.cfg.j2
        dest: /etc/myapp/application.cfg
        owner: root
        group: root
        mode: "0600"
	diff: false
Note that the “diff” means it prevents the generated file contents including the secrets from appearing if someone runs the playbook with the “–diff” argument.
Because the Ansible Vault is within the hosts/group_vars/all directory, it should just load it all automatically, although you may with to specify this explicitly for clarity.
Right, we are all set to use the Ansible Playbook, let’s give it a whirl.
Step 4 – Try to Run Ansible Playbook
If we just try to run the Ansible Playbook without specifying any Ansible Vault Password, we’ll get the following saying it can’t decrypt an Ansible Vault file that is being referred to within the Ansible Playbook.
ansible-playbook site.yml -u web01-admin -i hosts -l web01
To be able to access the Ansible Vault, we have a few options at our disposal, which one you use just depends on what you need to do, your security appitite, or if this Ansible Playbook will be automated into a CI/CD pipeline for example, i.e. not used interactively.
Ask for Password
The first way we can try is to just make Ansible ask us for the Ansible Vault Password at runtime.
ansible-playbook site.yml -u web01-admin -i hosts -l web01 --ask-vault-pass
And now it just runs as you would expect, and as you can see our new Role tasks are being run to deploy the file and hopefully the secrets from the Ansible Vault being written into the application.cfg file generated via the Jinja template!
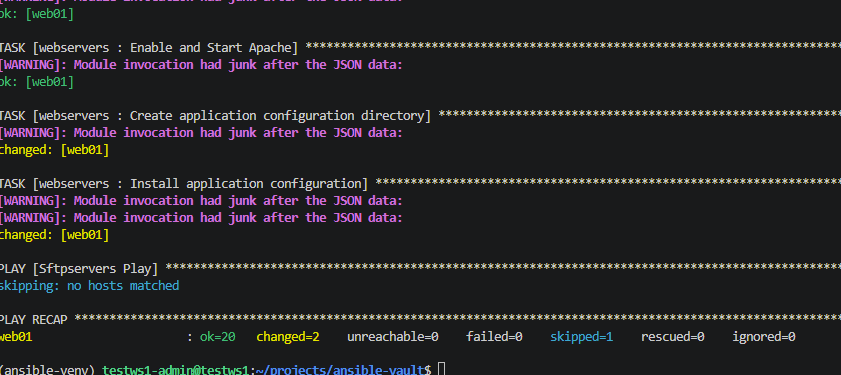
If we check our web server via SSH:
ssh web01-admin@192.168.102.201Then check for the application.cfg file and its contents:

As we can see, great success! We have the username and password written into the file. Which shows that the Ansible Playbook is able to successfully unlock and retrieve the secret at runtime.
Store in a File
So to store in a file, we can do the following steps. We must first create a file outside of our Git Repository, ideally somewhere “safe” within our home directory, let’s create a directory for this:
mkdir ~/.vault-password
cd ~/.vault-password
touch vault-password
chmod 600 vault-password
Now let’s edit the vault-password file and add the just the password, as it is nothing else is required.
vi vault-passwordNow when we run, we can refer to this file and it will read the contents and use them in to inject the Ansible Vault password from the file.
cd ~/projects/ansible-vault
ansible-playbook site.yml -u web01-admin -i hosts -l web01 --vault-password-file ~/.vault-password/vault-password
What you can also do is set an Environment Variable, you can’t put the actual Ansible Vault password into the environment variable (so you don’t have to keep referring to it), but you can do the next best thing and refer to the vault password file path instead,
cd ~/projects/ansible-vault
export ANSIBLE_VAULT_PASSWORD_FILE="~/.vault-password/vault-password"
ansible-playbook site.yml -u web01-admin -i hosts -l web01
So you can now run it, without refering to the file, because its implied by the ANSIBLE_VAULT_PASSWORD_FILE environment variable.
Store in an Environment Variable (within CI/CD)
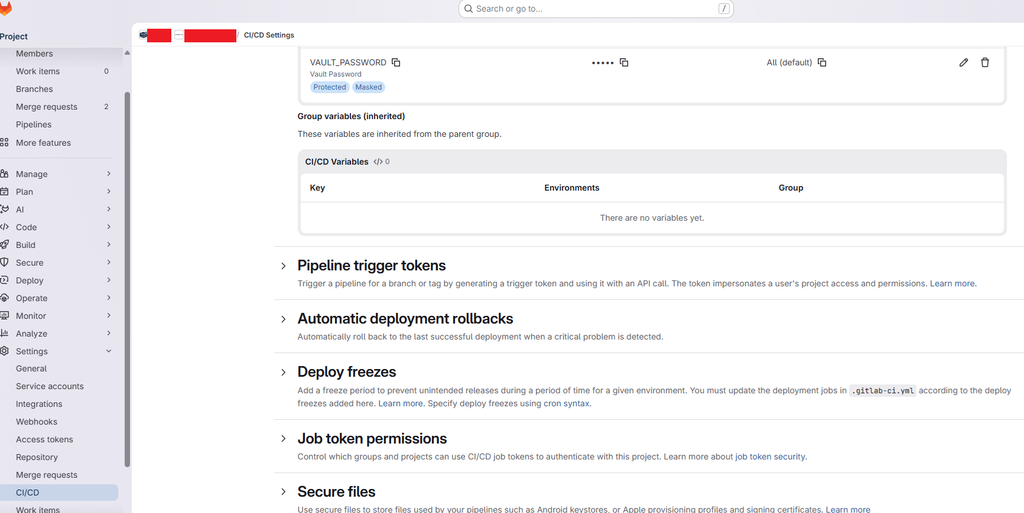
Although exactly how is beyond the scope of this document, you can store your Ansible Vault password within your CI/CD solution, for example within Git. As an Environment Variable it is held outside of the Git Repository thus is reasonably secure. But it can be referred to by your CI/CD configuration, for example from within the .gitlab-ci.yml file. A snippet is shown below of referring to this Environment Variable and then dumping it to a file within the environment, which is then referred to by Ansible via the special ANSIBLE_VAULT_PASSWORD_FILE environment variable we saw just a moment ago above.
.gitlab-ci.yml
...
webserver-update:
  stage: deploy
  script:
   - if [ "${BUILD_NEW_CONTAINER}" == "Yes" ] ; then exit 0 ; fi
   - chmod 700 -R Ansible
   - cd Ansible
   - echo ${VAULT_PASSWORD} >.vault_password
   - export ANSIBLE_VAULT_PASSWORD_FILE=${PWD}/.vault_password
   - ansible-playbook site.yml
   - rm -f .vault_password
  only:
   - main
  artifacts:
    expire_in: 1 week
    paths:
      # Should be relative to your root directory
      - things
Within Git, open your Repository, Settings → CI/CD → Variables, then here you can add it, for example VAULT_PASSWORD, if you are then referring to it within your CI/CD configuration, you need to ensure that it is referred to as per this variable name.
Update the Secrets in Ansible Vault
So let’s say we need to update these credentials, what do we do?
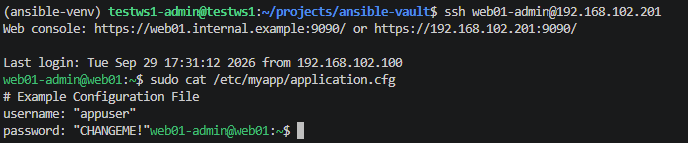
ansible-vault edit --ask-vault-pass ~/projects/ansible-vault/hosts/group_vars/all/vault.ymlWe now update the file with whatever change of password, let’s change the password to: CHANGEME! then just save and it will automatically re-encrypt the file for us.
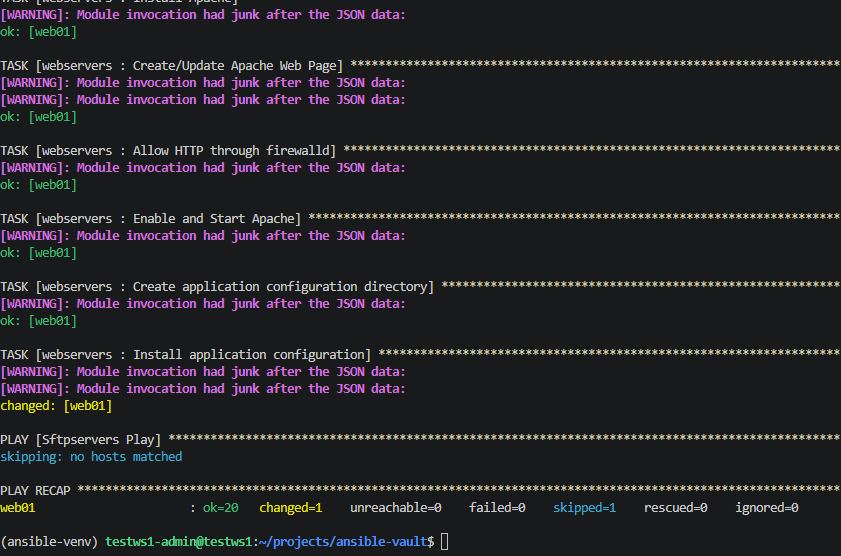
Now if we were to re-run the Ansible Playbook, we would see the following because the file has been updated, so Ansible pushes in the change to the web server.
And inspecting the file on the server, we can see it has indeed been updated:
Conclusion
So, what have we done? We have created an Ansible Vault, added our secrets to it, referred to those secrets from within our Ansible Playbook, then at runtime provided the Ansible Vault password in order to decrypt its contents and use it has the Ansible is rendering. We also looked into how you can supply this at runtime, e.g. via a file or Environment Variable injected with CI/CD Pipeline, but also via a file referred to at runtime. Finally we looked at how we can update the secret in the Ansible Vault for any changed, essentially unlocking, updating and re-encrypting.